After setting up my first ASP.NET Core MVC site I’ve looked in to expanding it with a test project and taking advantage of more of the new features.
Test project
One of the first things I wanted to learn how to do in ASP.NET Core was how to get some unit testing going.
Firstly I set up the solution structure by creating a source directory and a seperate test directory. At the root of the solution I added a global.json file.
{
    "projects": [
        "src",
        "test"
    ]
}
In the test directory, to create the test project, there is a very helpful dotnet command.
dotnet new -t xunittest
This is a very helpful option to the new command. In the project.json file it sets the testrunner to xunit and the needed dependencies.
I’ve not used xunit before, but apart from a few syntax differences to nunit, it seems pretty straightforward.
For a mocking framework I went with Moq. It’s not my first choice, but I read it worked with ASP.NET Core so I went for it. Below is the dependancy to add to the project.json;
"Moq": "4.6.38-alpha",
Once all the tests are in place, you just need to run the following command in the test project;
dotnet test
The docs for testing in ASP.NET Core can be found here.
It was a big relief to find that setting up unit testing was straightforward as I’m loving learning ASP.NET Core and I didn’t want it to be a blocker.
Tag helpers
While in ASP.NET Core you can use Razor as your view engine, there are still some updates that you can take advantage of. On my little test site I was trying to set up a form by using the html helper begin form;
@using (Html.BeginForm())
{
    //form goodness goes here
}
However after reading through the ASP.NET Core docs I found the new tag helpers. I was sceptical at first as I’ve always found html helpers to be useful and didn’t particularly consider them needing replacing.
But now I’m a convert, tag helpers are pretty cool.
So my form became;
<form asp-controller="Home" asp-action="Index" method="post" id="usrform">
    <!-- Input and Submit elements -->
    <button type="submit">Get name</button>
</form>
No longer do you need to fill in the html helper’s signature, you just write the markup you need with the required attributes. For example to set the controller;
asp-controller="Home"
This makes the markup much nicer to read for everyone and removes that dependence on knowing how to use each helper. For example I would much rather read;
<label class="myClass" asp-for="MyProperty"></label>
Compared to;
@Html.Label("MyProperty", "My Property:", new {@class="myClass"})
I’m so glad I don’t have to remember that awful syntax for adding classes to html helpers.
_ViewImports.cshtml
In order to use tag helpers you need to make them available in a _ViewImports.cshtml file in the Views folder.
@addTagHelper "*, Microsoft.AspNetCore.Mvc.TagHelpers"
The above will add the tag helpers in the Microsoft.AspNetCore.Mvc.TagHelpers namespace. By following the same convention you can make custom tag helpers available as well.
Debuging
While unit testing massively reduces the need to use the debugger, I’m only human.
For a free IDE, the debugging capabilities of VSCode are fantastic.
Rather than using the VSCode launch.json and the built in debug launcher (since it’s not a console application), attaching the debugger to the running process worked well.
By running “dotnet run” from the source directory of the application the mvc site will be up and running. Then from the debug panel choose the attach to process option.
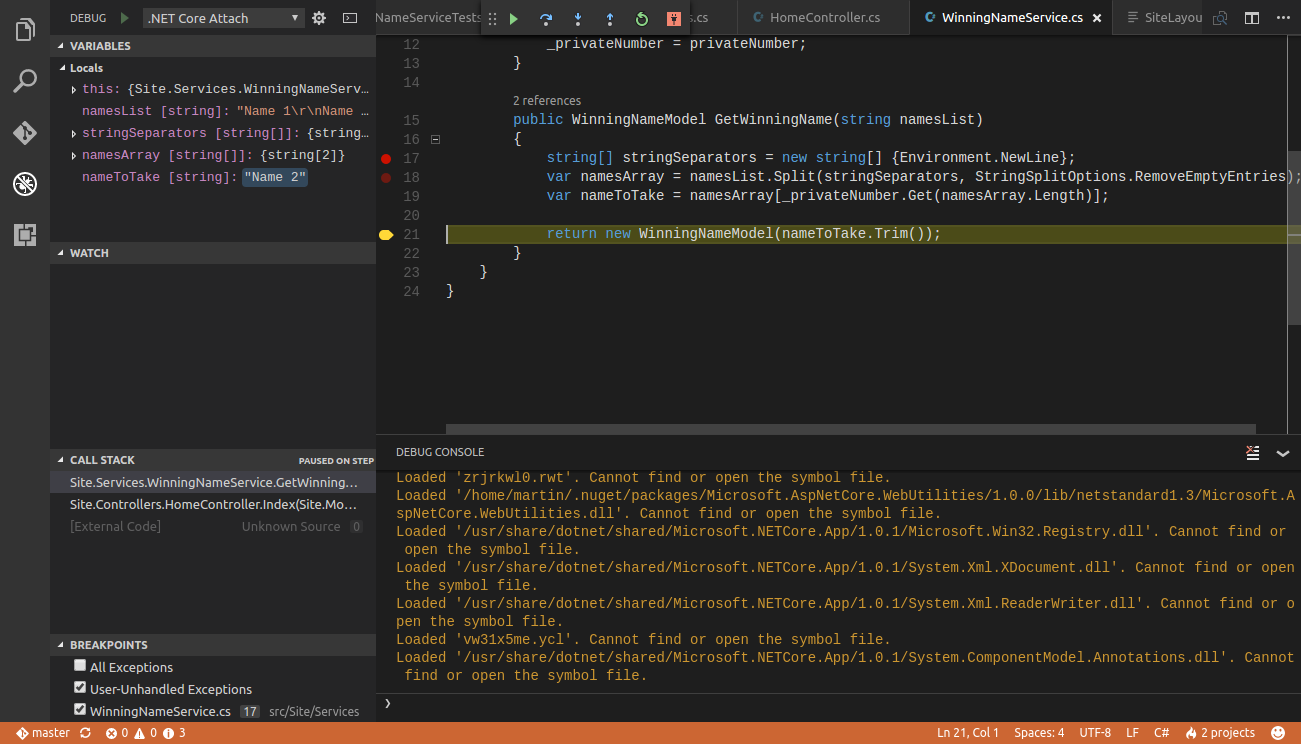
As you can see in the screenshot, the debugger is pretty comparable to debugger in the full version Visual Studio. You can set break points, watch variables and step through.
Static files
The typical location for static assets in an ASP.NET Core MVC app is in a folder called wwwroot at the root of the project.
Then in the WebHostBuilder set the content root to be the current directory.
var host = new WebHostBuilder()
    .UseKestrel()
    .UseContentRoot(Directory.GetCurrentDirectory())
    .UseStartup<Startup>()
    .Build();

host.Run();
Static assets will then be available by using a relative path to the wwwroot folder. For example;
<link rel="stylesheet" href="~/css/bootstrap.css" >
Example site
My example site so far is on Github here