Alexa hosted skill
You can now build an Alexa skill without needing to provision your own resources in AWS with an Alexa hosted skill.
As part of an Alexa hosted skill it will automatically provision a Lambda endpoint to run the code for you skill. It will even give you S3 media storage and a table for session persistance.
If your skill gets popular or you have some specific requirements, you may want to provision your own infrastructure, but the hosted skills are great, especially if you are trying out developing a new skill.
Create a self hosted skill
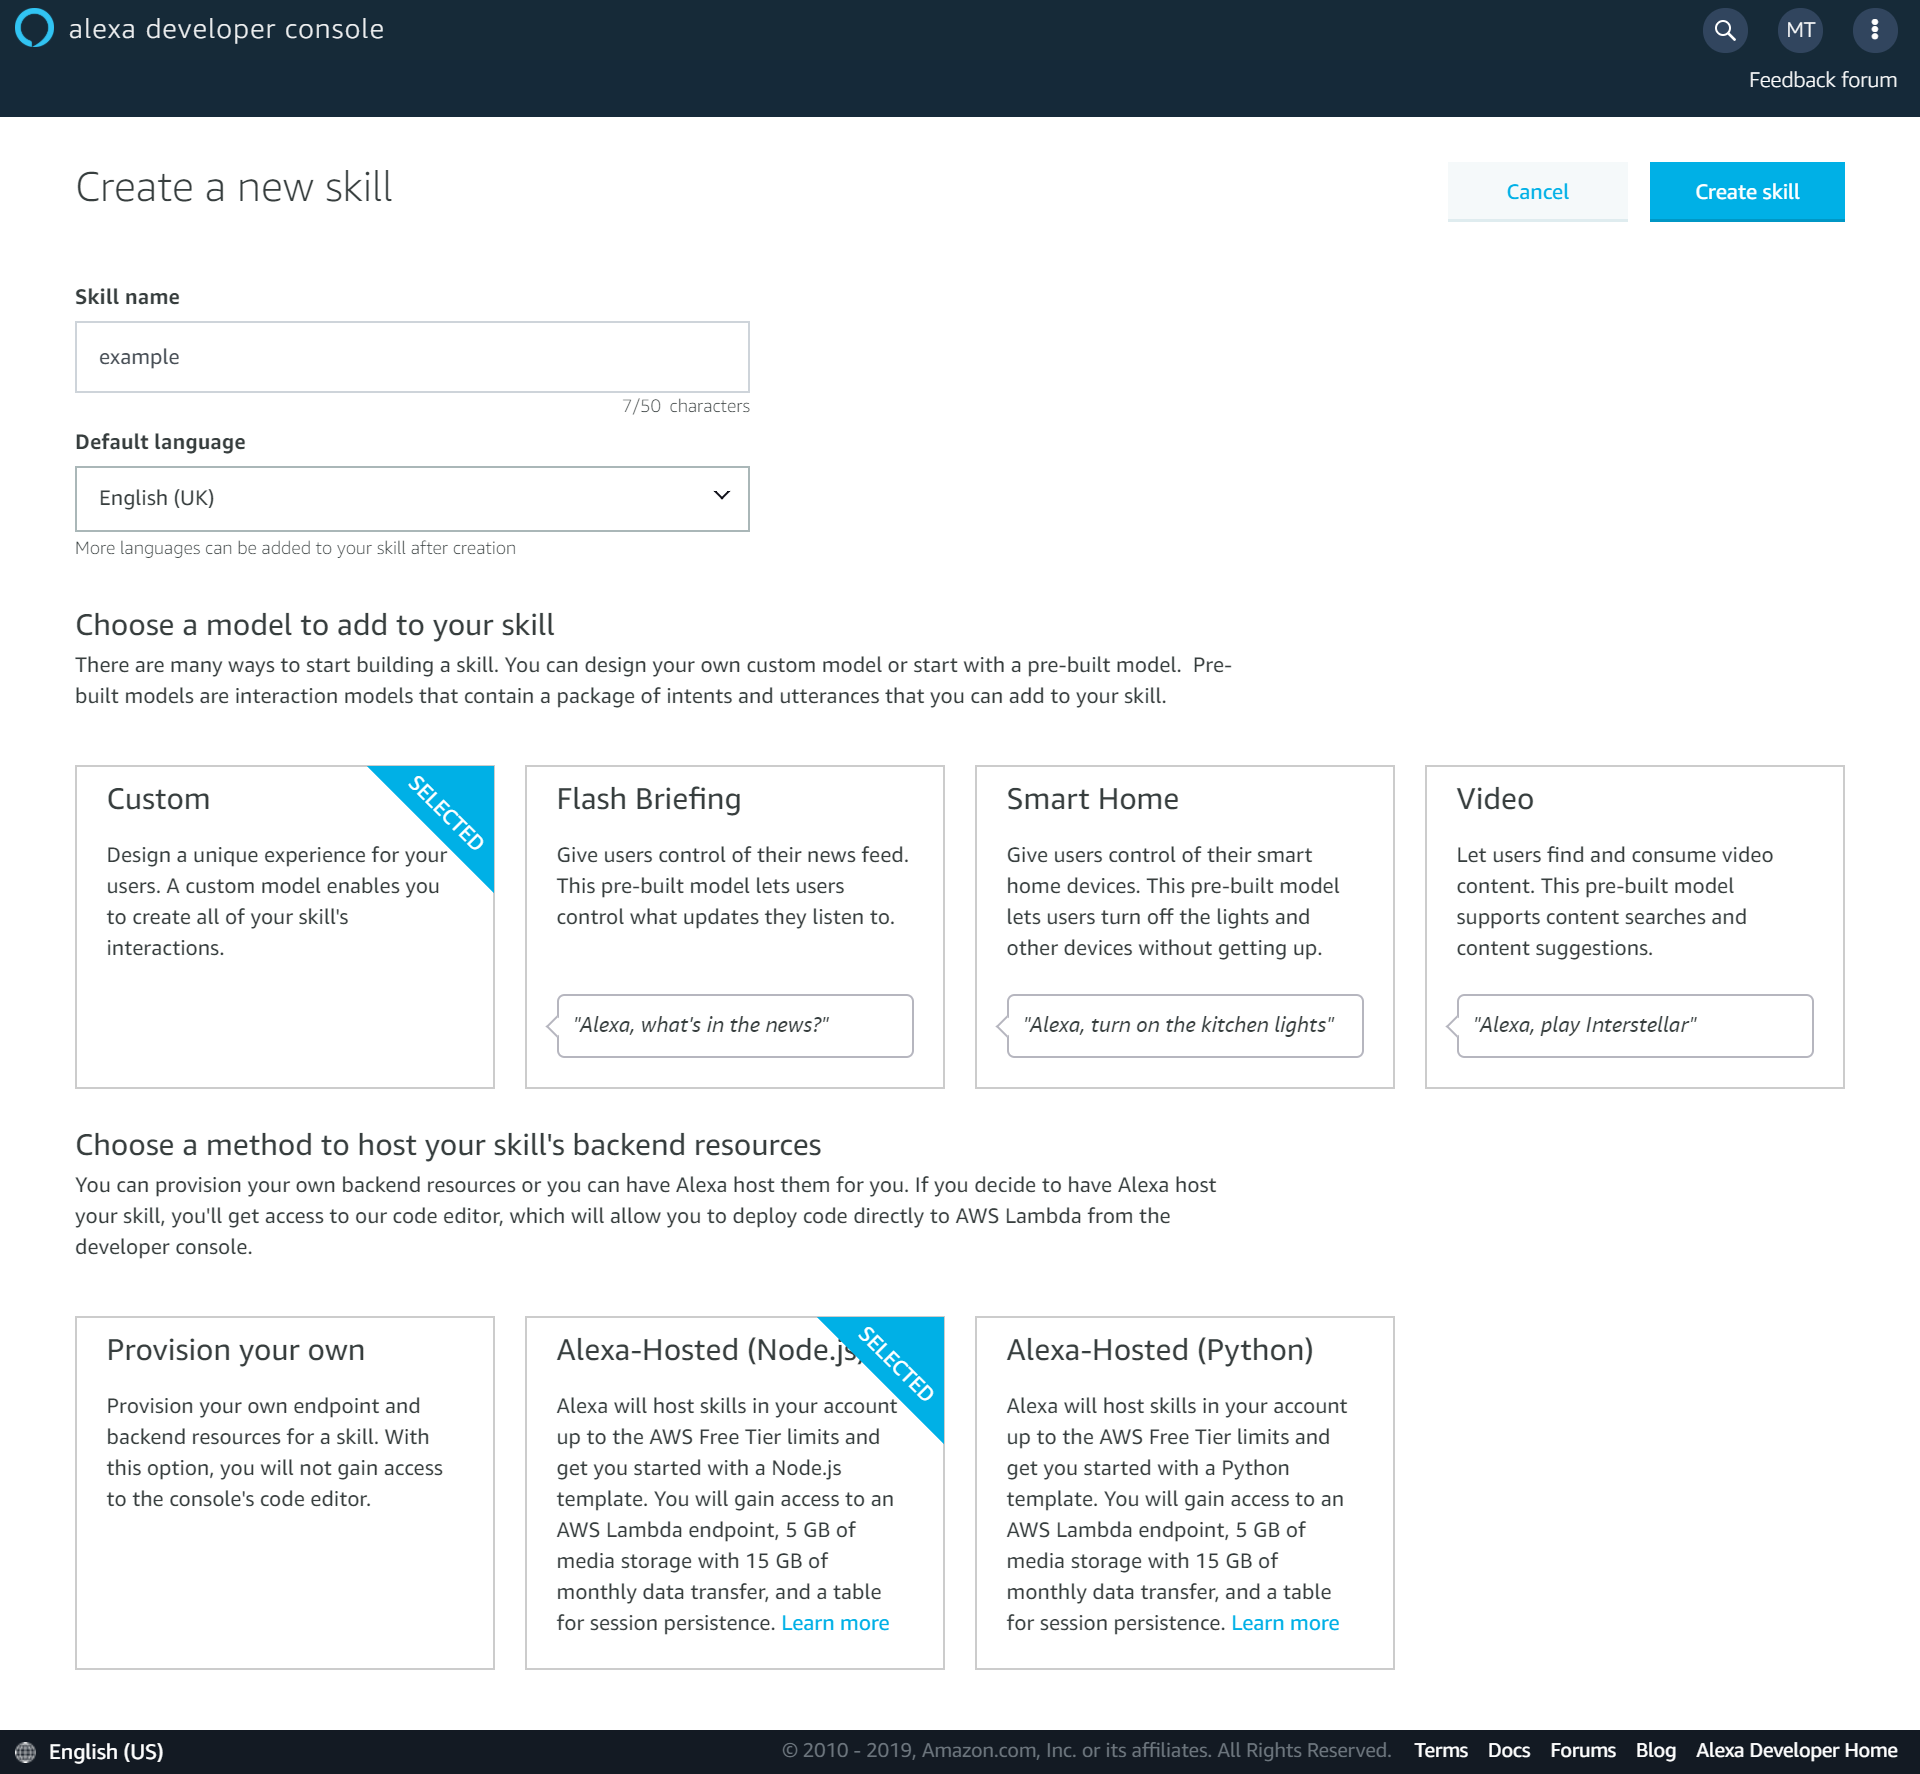
To start with your Alexa hosted skill, go to the Alexa console and click on “Create Skill”.
Once you’ve given your skill a name and selected the language, make sure you select “Custom” for the skill model and “Alexa-Hosted” for the method to host your skill’s backend resources.
Once you’ve made your skill, you’ll have access to the settings for your new skill.
Intents
The intents are like the actions that your skill can carry out. They are the link between a user telling your skill what they want, and your code for the skill.
On the “Build” tab in the console you can add a new intent. Your new skill will have come with several built in intents, such as a “HelpIntent”, and you can choose from multiple other built in intents. You can also create a custom intent for your own custom actions that your skill will perform.
Once you’ve created a new intent you can add the Sample Utterances that will be used to activate the Intent.
Intent handlers
After your Intents have Utterances against them for routing, you need to create the handlers for them. For basic handling of an intent you create a handler with the following functions.
canHandle(handlerInput){}
handle(handlerInput){}
By checking that the input is an IntentRequest and the Intent name is for the Intent you want to handle in canHandle you configure your handler for the intent.
In the handle function you set your logic for what you want to be returned to the user. Passing a string to the speak function will make Alexa speak the string out to the user.
const HelloWorldIntentHandler = {
    canHandle(handlerInput) {
        return Alexa.getRequestType(handlerInput.requestEnvelope) === 'IntentRequest'
            && Alexa.getIntentName(handlerInput.requestEnvelope) === 'HelloWorldIntent'; //replace with your Intent name
    },
    handle(handlerInput) {
        const speakOutput = 'Hello World!'; //add the logic for your intent response here
        return handlerInput.responseBuilder
            .speak(speakOutput)
            .getResponse();
    }
};
ASK CLI
I found the online code editor in the Alexa console to be pretty impressive. However, for more complex skills you are probably going to want to use an IDE that you are familiar with by using the ask cli.
The Alexa Skills Kit (ASK) CLI is used to manage your skills and their related resources. For this basic skill example, you can use it to clone the code for your skill for local editing then deploy it the Skill Console.
In order to install the ASK CLI, follow the instructions here.
Then by using the command
ask clone
you can pull down the code and the interaction model for you skill. Once you have cloned your skill, you can edit your skill locally. After editing, use the following command to push your changes up to the Alexa Skills Console,
ask deploy
For more information on the commands available on the CLI, check the docs here.
Test your skill
Testing your skill is super easy within the Alexa Skills Console. Head to the “Test” section of the console and enable testing for your skill in development.
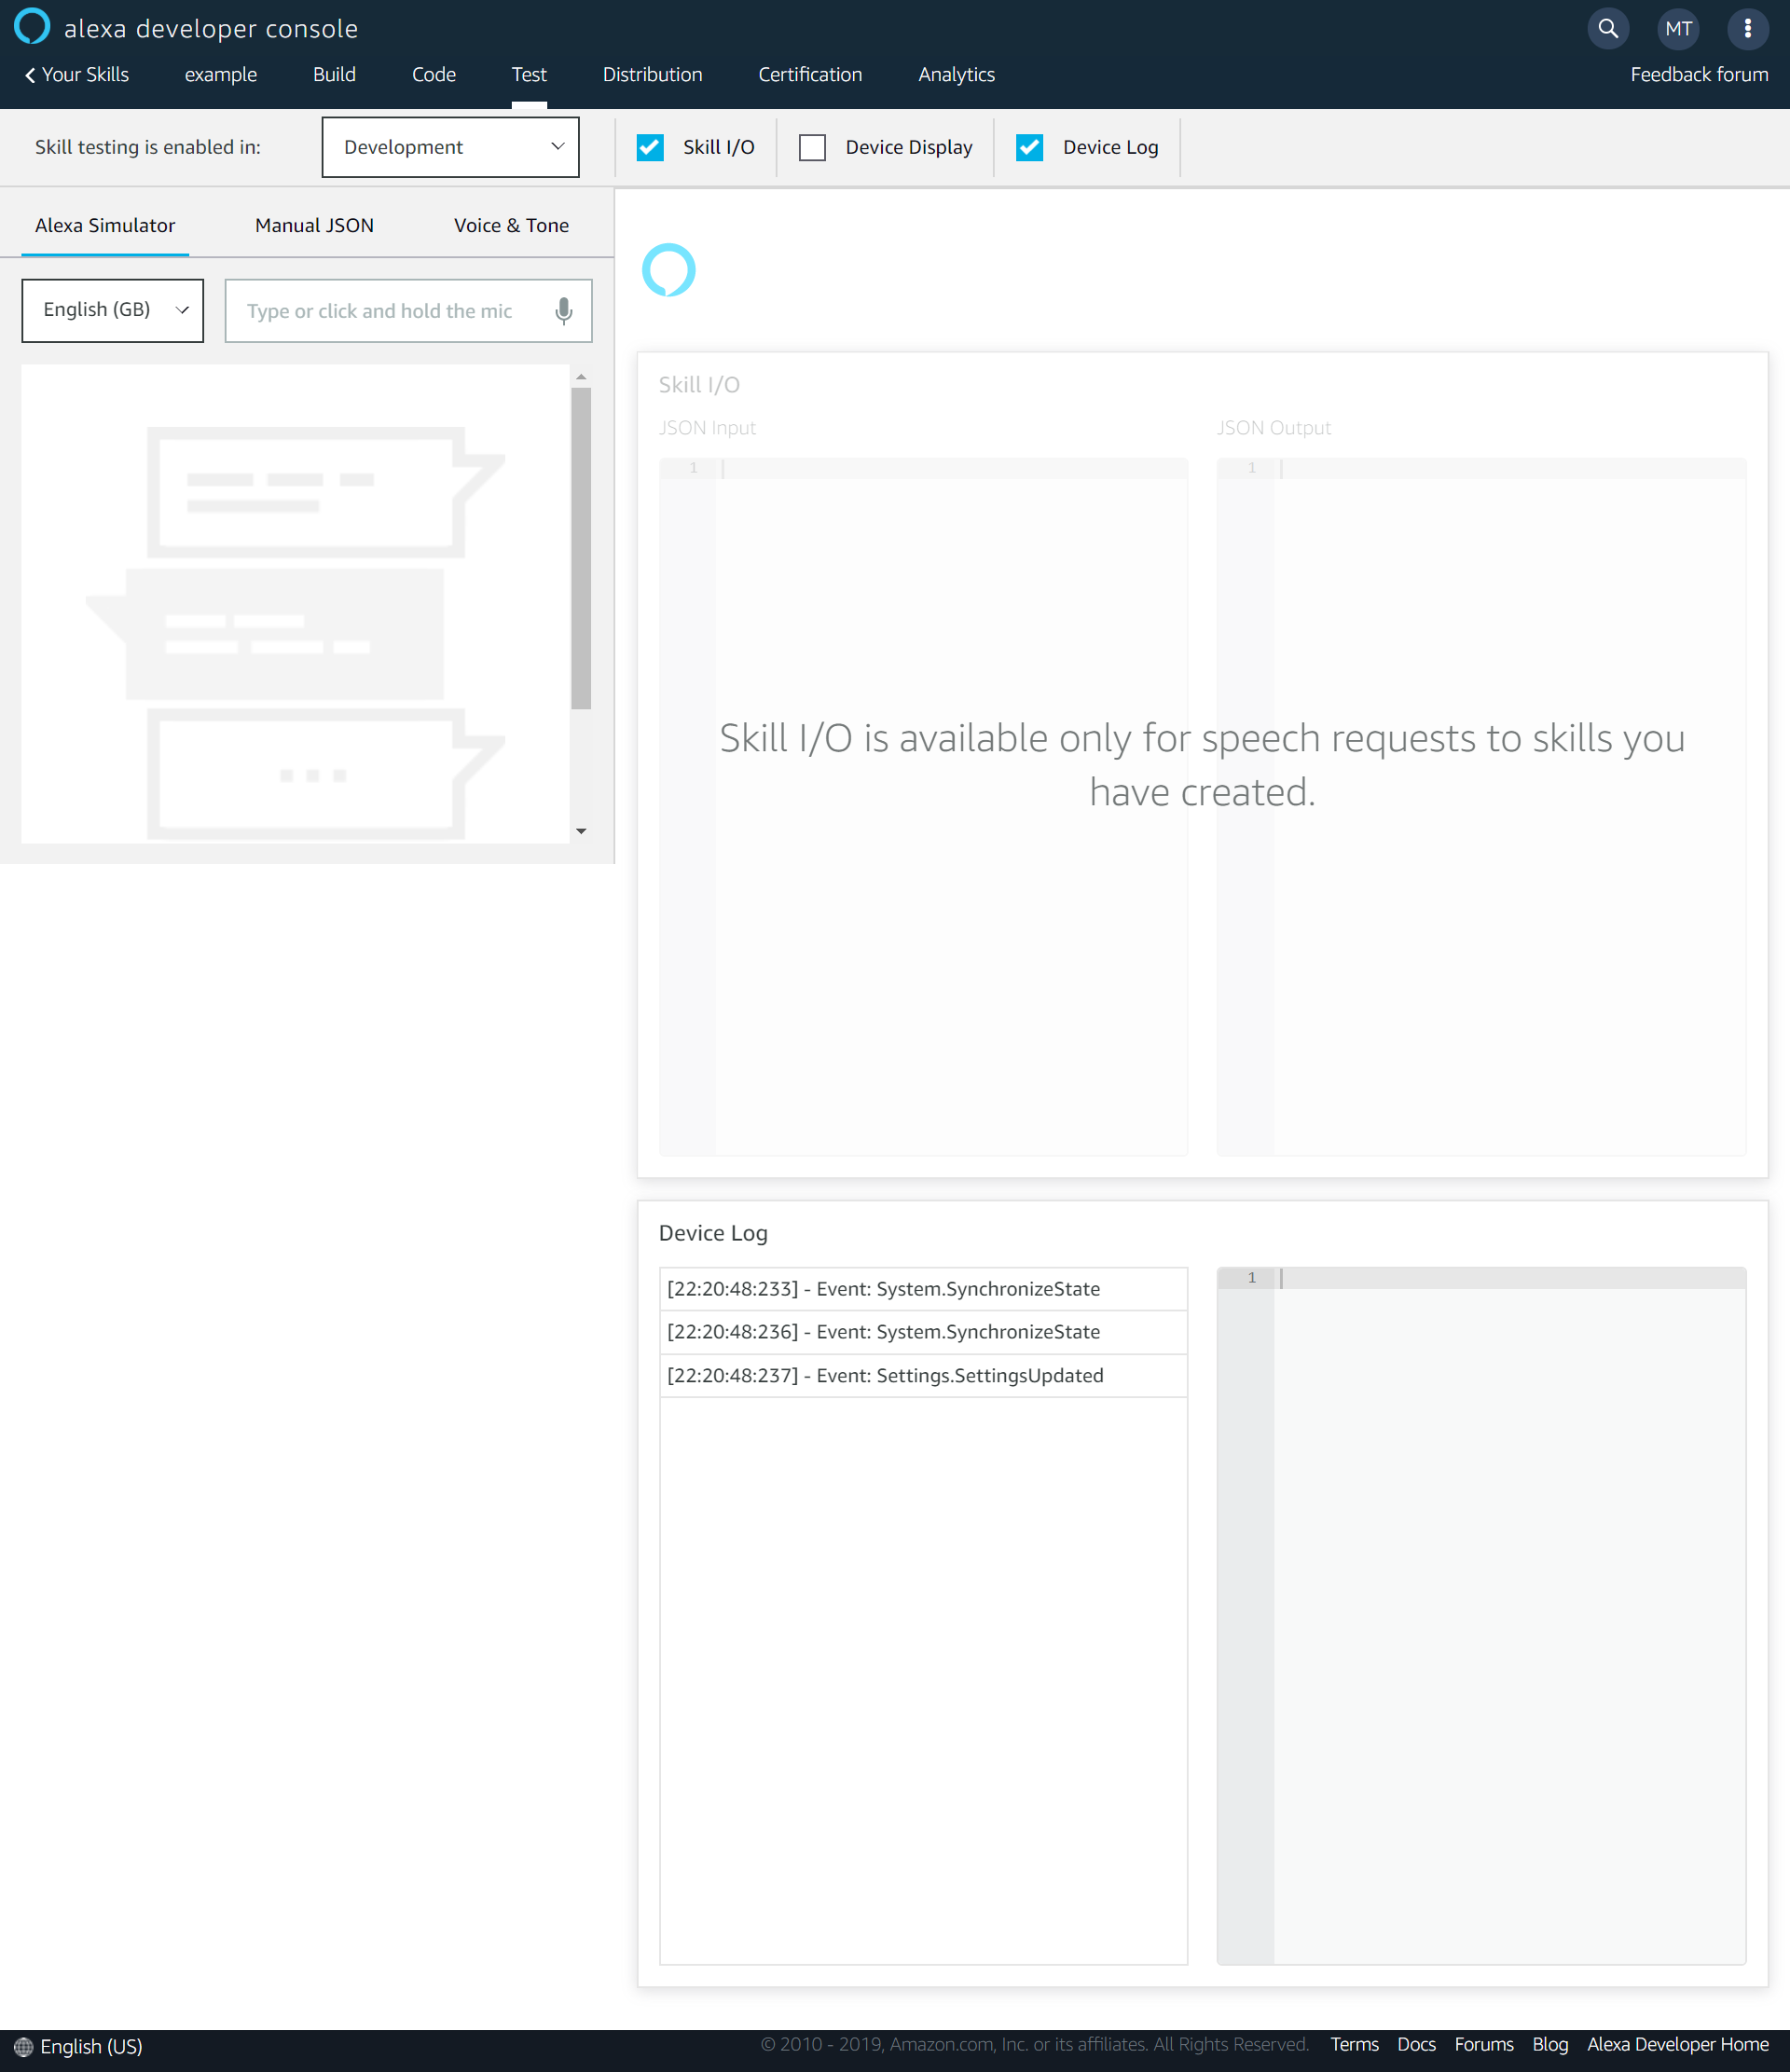
It really impressed me that you are able to test your app by typing your invocations and utterances rather than just having to speak them.
Make sure that you have built your interaction model on the “Build” tab and deployed your code on the “Code” tab within the console. Forgetting to do that is an easy way to get unexpected results while testing your skill.
For more info about the test configuration oprions, check the docs here.
Publish your skill
In order to get your skill live and available to users in the Alexa Skill Store, you’ll need to fill out the form on the “Distribution” tab in the console. Compared to some other app store processes, the level of detail needed for a skill felt pretty nice and lightweight.
After filling out all the details about your skill, go to the “Certification” tab and run the validation. This process will highlight any issues that you’ll need to resolve before you can publish your skill. Once any issues have been resolved, it’s time to submit your skill!
On the “Certification” tab, go down to Submission and submit your skill for review. I’m guessing they do have busy times, and my skill was super basic, but my skill was accepted in just a few hours.
And that’s it! I was super impressed by how simple Amazon have made it to get up and running and create your own Alexa Skills. The addition of the hosted skills is a huge bonus, for both someone just experimenting like me, or even for a business who wants to test an idea quickly. This guide was just the very basics to getting a skill in the store. So I’ll do some more posts on some features to make your skill even better, such as storing session data and making your skill more conversational.
Concentric Slicing
As a big fan of agile ways of working, story slicing is pretty important to me. How you break down work can have a huge impact on how quickly you can start realising value.
Recently I’ve been thinking of a new way to slice work so it can be delivered iteratively and get the most value in the shortest time.
Why slice work at all?
It’s important to think about how software is delivered, not just the end result.
Releasing regularly can help to create smaller feedback loops to validate ideas and assumptions, and to help you start getting value for the effort sooner.
If it is a larger piece of work, slicing up the work avoids a team from working in a waterfall fashion where nothing is seen for a long time and when it is revealed in a tada moment it may be wrong.
Horizontal and vertical slicing
Two common ways of slicing down work are to do it either horizontally or vertically.
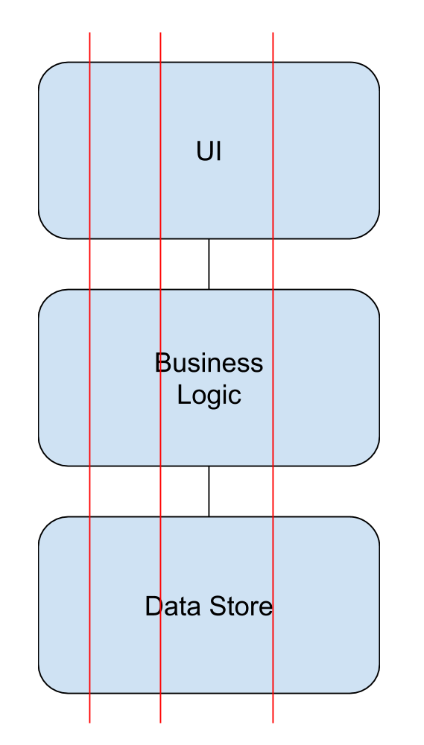
To look at the differences between horizontal and vertical slices, let’s imagine a new form page is needed on a website to collect potential customer details, process this information, and then store them.
Horizontal
When work is split horizontally, this refers to tasks being divided by each part of a system. For example, you might have one ticket to update the UI, another to update the business logic layer, and finally a ticket to implement a data store.
The issue I have with horizontal slicing is when it comes to releasing work and realising value from the work. In this example, you could only really release to live once all the work has been completed. You can’t really release a new form that isn’t hooked up to anything.

Vertical
A different way of slicing this work might be to slice it vertically. When slicing vertically it is important for each piece of work to be releasable on its own. An example way of slicing the work here could be to have the first story just collecting a single field, such as email address. But the email address work would be implemented in each layer of the application. Then the following tickets of work would be to expand the form to add in the following fields.
I like vertical slicing as you can release features as they developed, allowing you to get value sooner. You also hit unknowns more quickly, for example if the data later and the domain application are developed separately and there is a disconnect somewhere, you would only find that out when both pieces of work are complete.
However, I do often face the questions, is it worth doing those first super thin slices? How will we get value from those alone? The more I’ve thought about it, the more I think these are valid questions on vertical slicing. Vertical slicing is of huge benefit to developers but I can see how it can be frustrating or hard to appreciate for a business. Certain functionality was requested but delivering it incrementally can be seen as frustrating.
Concentric slicing
This is where I came up with the idea of concentric slicing. Rather than slicing a story or feature along lines in the architecture, I thought it would be useful to slice stories around their value.
What if the first slice was to address the core need in the simplest way possible? Then each following slice would be to expand the functionality by wrapping around the previous slices.
Going back to the form example, the slices could work in the following way. Initially you would need to understand what the main need is. So if the main need was to collect customer details so you contact them and you do need all the fields to do this, the simplest way might be to log out the form entries to a file on the server. This file could then be manually passed to the people doing the customer contact.
This first slice allows the actual value of the work (contacting the customers) in the shortest time. Yes there may be some manual steps after only this first slice is done, but at least you can start validating the value.
Subsequent slices can then focus on refining the process. For example the next slice might be to do some data processing on the form entries but then still log them to the file. Followed by a slice that stores them in a database. With a final slice to automatically contact the customers.
This approach may incur some form of re-work, but I would wager in most cases the cost of that re-work would be greatly outweighed by getting the value from the work as fast as possible and being able to validate the idea much more quickly.
This approach to story slicing can have huge benefits in a time pressured environment. By focusing on where the actual value lies and making sure that gets achieved, allowing for manual process and re-work, you can try and make the first slice meet the actual deadline. Any subsequent stories will just be improving the process and be under much less time pressure.

When life doesn’t match the theory
I think it’s important to remember why we slice work on the first place. We do it so that work can be delivered incrementally by multiple releases and find blockers sooner, and deliver value as quickly as we can.
With that in mind I can’t really say one way of story slicing is better than another. You need to take your current context into account. But if you remember why we slice, knowing different ways to do it can help a lot.
If you’ve got any thoughts on story slicing I’d love to hear them.
White Lines
White space can be very helpful but in the wrong places it can be sign that a bit of refactoring might be helpful.
Why blank lines in code are a problem
Adding in a blank line often feels like a natural thing to do while programming. Just like adding a full stop at the end of a sentence, a blank line can finish a thought.
However, if a function has these blank lines breaking up the code, that can be a sign that there is more than one thought in a function. If there are clumps of lines together it is usually a sign that methods or classes could be extracted.
In this example, blank lines have been used to separate the logic for the calculating the subtotal and the discounts.
function CalculateTotal(products, priceList) {
    let subTotal = 0
    products.forEach(product => {
        subTotal += priceList.getPrice(product)
    });

    let discounts = 0;
    if(products.filter(product => product.inDiscount).length == 2) {
        discounts = 20
    }
    if(products.filter(product => product.inDiscount).length > 4) {
        discounts = 40
    }

    const total = subTotal - discounts
    return total
}
Uncle Bob has a great analogy for why people like to break code up with things such as blank lines. He likens finding your way around a code base like that to recognising features in a landscape. When someone knows an area they might use landmarks such as mountains on the horizon to know where they are. The shape of the code can act in the same way. However if you don’t know the area those landmarks offer little help, just like blank lines offer little help in an unfamiliar code base. Well extracted and named functions or classes are a much nicer way to navigate without that tacit knowledge.
How to deal with blank lines
As I’ve mentioned, a straightforward refactoring you can do if you have logical groups of lines broken up by blank lines is to extract those groups in to methods.
The example has been refactored by extracting out the logic to new functions.
function calculateTotal(products, priceList) {
    const subTotal = calculateSubTotal(products, priceList)
    const discounts = calculateDiscount(products)
    const total = subTotal - discounts
    return total
}

function calculateSubTotal(products, priceList) {
    let subTotal = 0
    products.forEach(product => {
        subTotal += priceList.getPrice(product)
    });
    return subTotal
}

function calculateDiscount(products) {
    let discounts = 0;
    if(products.filter(product => product.inDiscount).length == 2) {
        discounts = 20
    }
    if(products.filter(product => product.inDiscount).length > 4) {
        discounts = 40
    }
    return discounts
}
Further refactoring should be done on this example, but by extracting the logic clumps to their own functions, rather than using blank lines, the intent is much clearer.
If you have several groups of lines and they are sharing data, it might make sense to extract a class during your refactoring.
I have seen some push back against this advice. I’ve heard comments like, “these functions are too small now” or “that’s too many files in the project”. But for me, many small, well named things are much easier to navigate my way around though.
I loved Martin Fowler’s example of a small function though. In his book, Refactoring, he tells of the example from Smalltalk of a single line function called Highlight which only calls the function Reverse. While this is a single line function, it still made the code easier to understand.
So like all code smells, I wouldn’t say blank lines in themselves are a problem, but they might be a sign that a useful refactoring may be a good choice.
The Phoenix Project
I’ve finally gotten around to reading the Phoenix Project! With practical advice on how to improve the performance of an IT department, it’s a great read for anyone who is involved with software projects.
It’s a spiritual successor to the AMAZING book, the Goal. It takes Goldratt’s principles and applies them directly to the software development world. It does a great job at doing this, but I would definitely recommend you read the Goal first to fully appreciate the lessons provided.
Who this book is for
Unlike the goal, the phoenix project is focused on IT delivery. The story follows an IT manager and how he turned around a failing IT department within a failing company.
Obviously this book is a great fit for anyone involved in the delivery of software but the lessons in it could be applied to many different situations.
Erik
The first thing I’ve got to talk about in the book is the enigmatic guru Erik.
Throughout the book, Erik gives little pieces of advice to the protagonist to help him improve the situation of the company. To be fair, I agree wholeheartedly with the lessons, but I think the way he delivers them is shocking. An example of his unacceptable behaviour is he refuses to use people’s correct names until they agree with his points.
Just because you may know more than someone on a particular topic doesn’t mean that you should talk down to them. If anything, it is the opposite, you should work with someone to understand what experience gave you that knowledge and share it.
Now my rant is over I’ll look at some of the great ideas in the book.
What I enjoyed in the book
If you only take one lesson away from the phoenix project it should be to identify and widen your bottlenecks. A bottleneck is an area in your business that has the smallest limited capacity and therefore is restricting the flow of the system.
In the book, the bottleneck is an engineer called Brent. Brent is the only one who knows how a lot of systems work. So a lot of work gets piled up behind him in the system. By identifying this as a bottleneck, you can start to look for ways to widen it. Ideally this would be to train other engineers on the activities Brent does. But even having someone helping him would be good. The person helping him might not feel as efficient as they are not doing “their job” but the system as a whole will improve.
Focusing on where the value is also massively important. Rather than continuously starting more work that never makes it to live, focus on the work that is closest to live. Visualizing the work in progress can be massively helpful with this. There are loads of tools such as Trello that can help. Or even using cards like they do in the book.
Many small deployments is another realization that they came to in the book. I couldn’t agree with this more. If deployments are a scary struggle, don’t wait and bundle them all together for a big bang release. Do them more often!
To help with his you should be looking at automating your deployments. If there is a human element within a deployment method, at some point it will definitely go wrong.
Great book, now go read the goal
The phoenix project is a decent book with a lot of good points being made.
Anything that advocates for better delivery of software is worthy of reading. However it’s not been able to replace my love for the goal. I found the lessons in the goal to be more impactful for myself. This was down to the goal not being software oriented and I had to see how they applied to software delivery myself.
AWS Console Quick Links
With so many services available, AWS has made cloud development much easier. However, navigating around so many services can be a little confusing. Using the one click navigation bar, you can get to the services you use the most easily and quickly.
Setting up the toolbar
Setting up the toolbar is super easy, but it’s not immediately apparent that the tool bar even exists, never mind how to set it up.
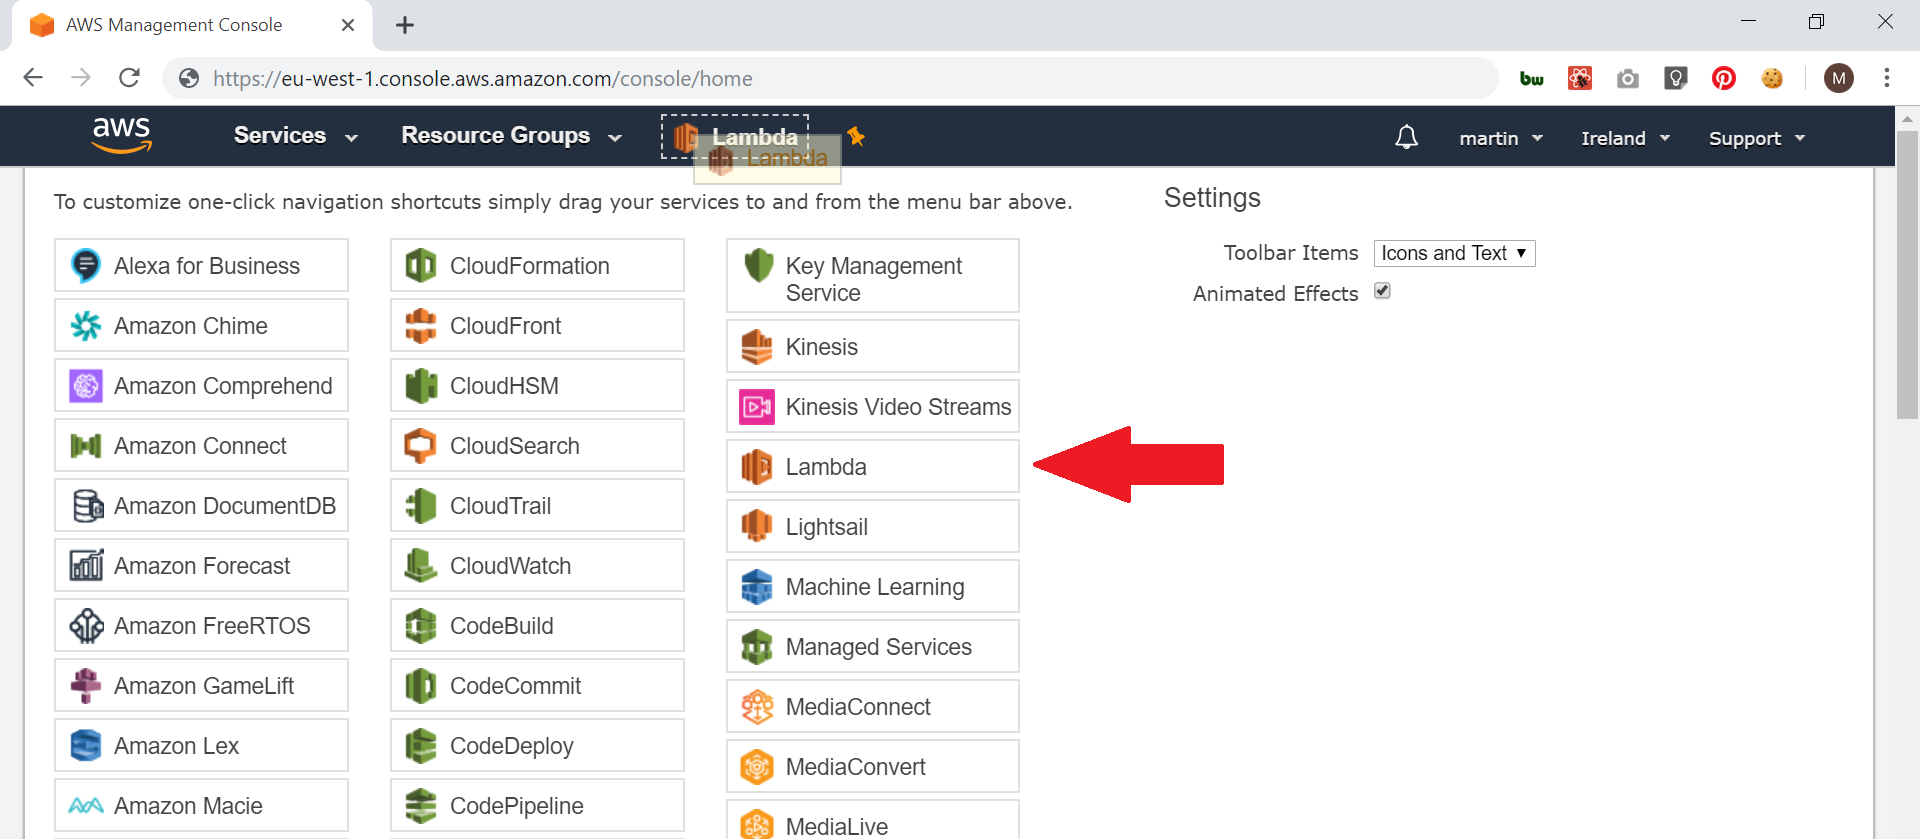
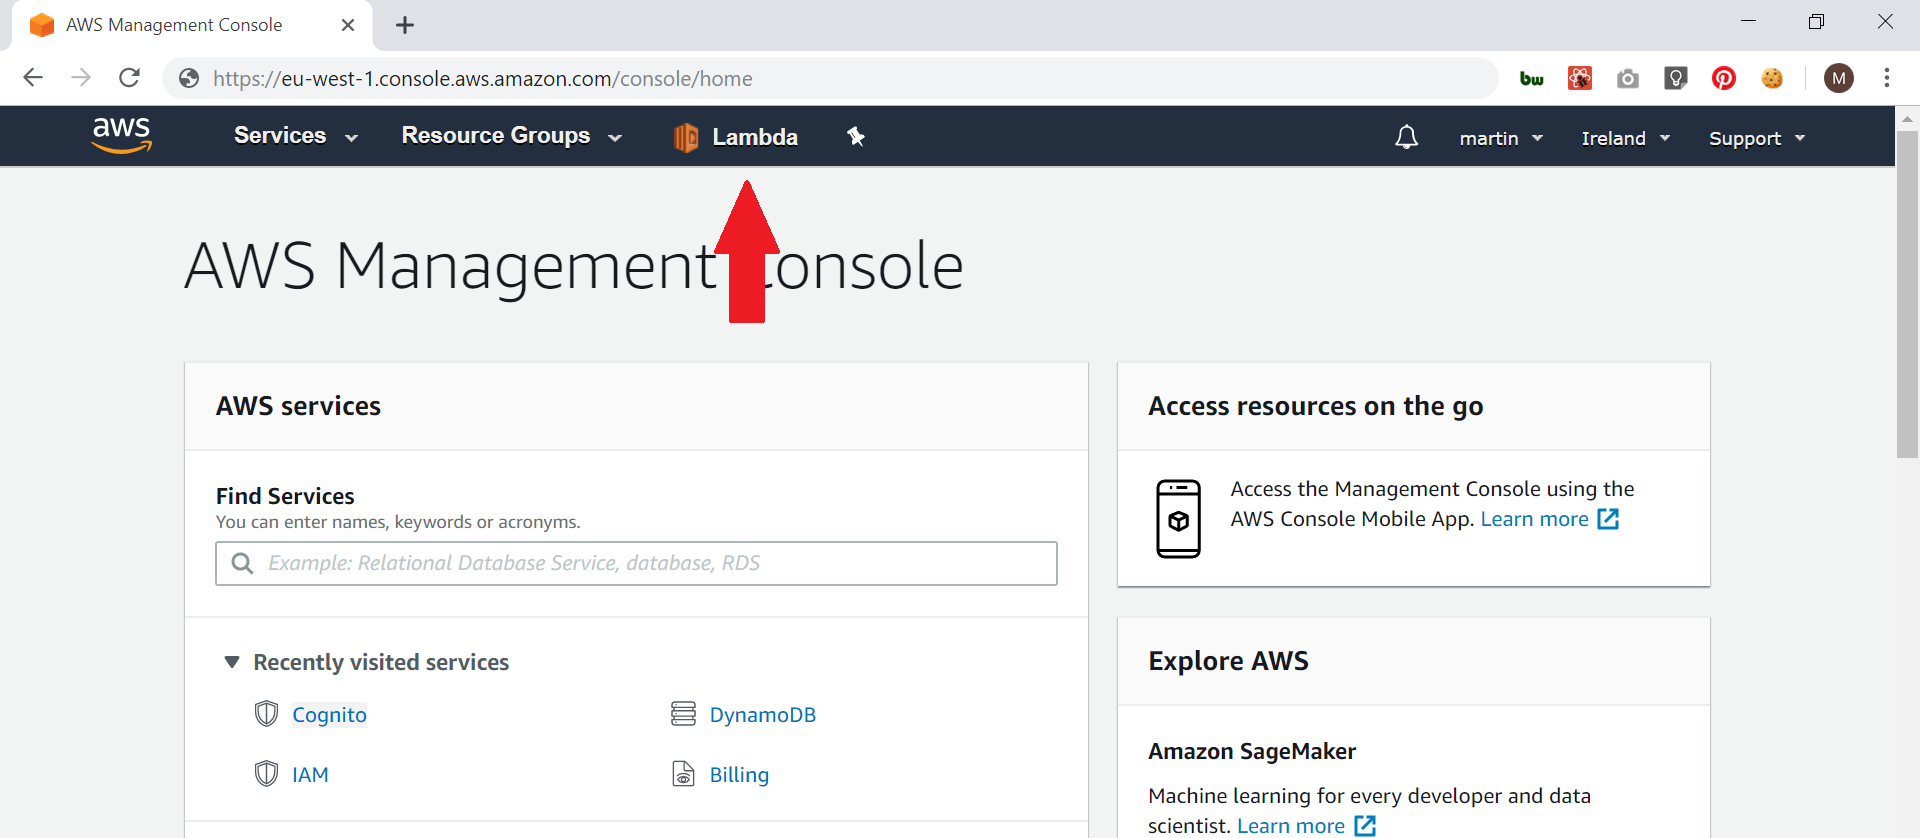
Firstly, click the push pin icon at the top of the AWS console;
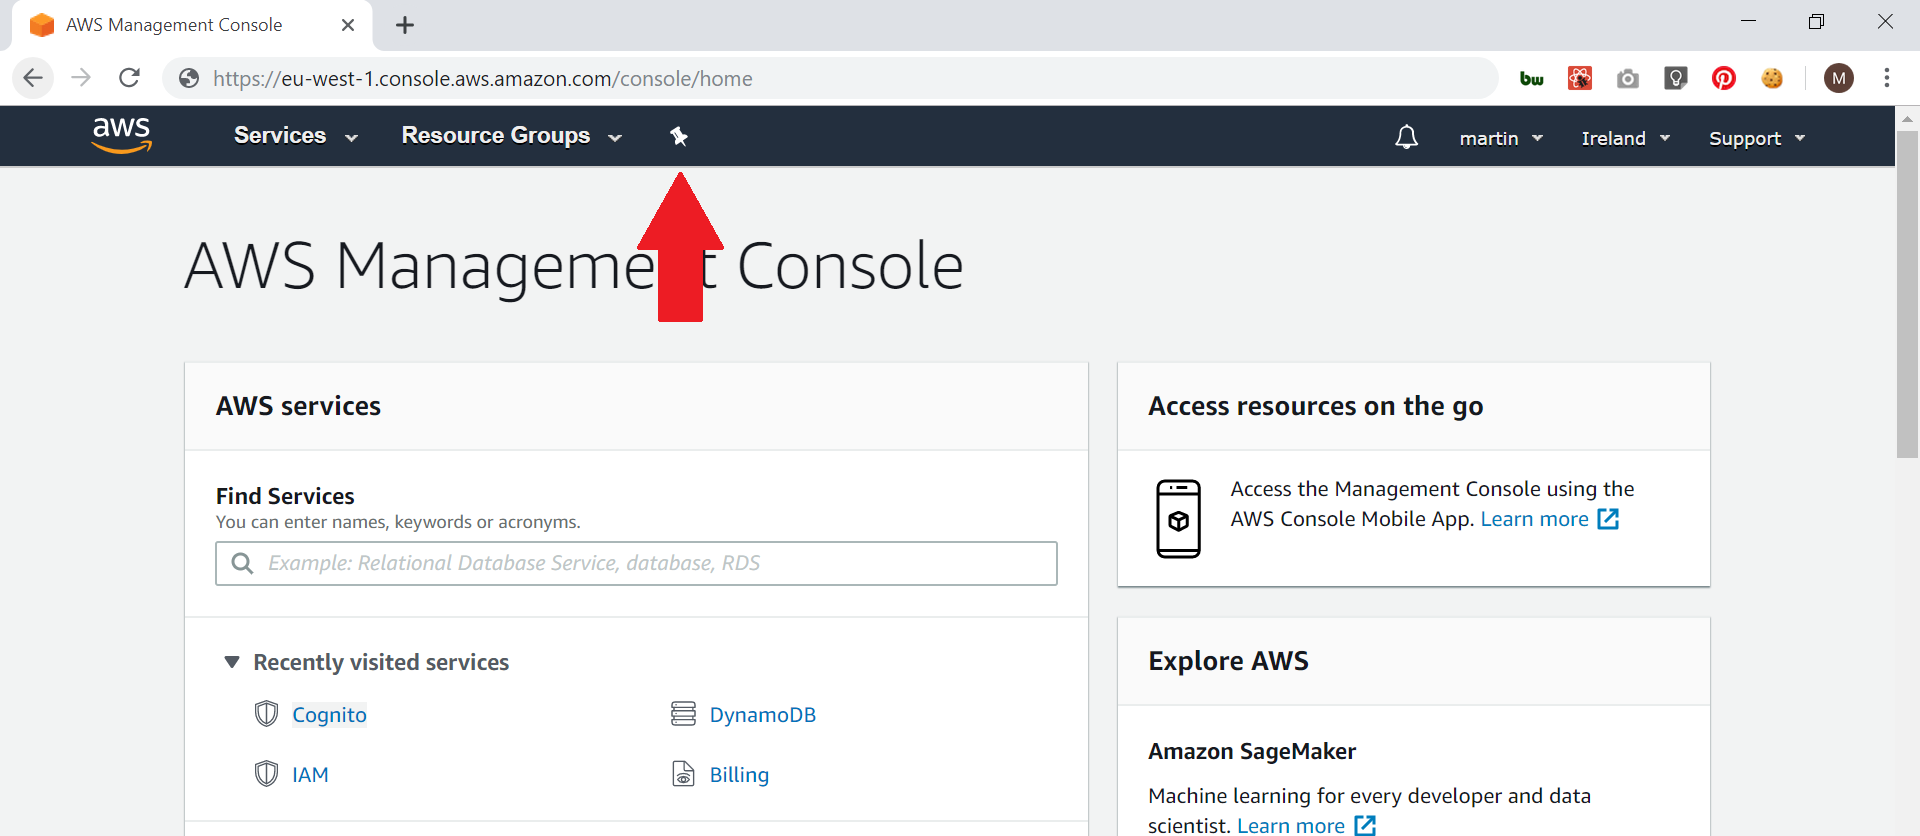
Then drag any commonly used AWS services to the top of the screen;
Once all the services you want are at the top of the screen, click the push pin again to finish.
Hopefully this little tip will help people save some time when navigating around the AWS management console!
If anyone knows any similar tips I would love to hear them.