Two truths and a lie retro
Retros are a great tool for a team to focus on continuous improvement. However, if you always run a retro in the same way, it runs the risk of becoming a chore for the team and you might see the value of them reduce over time.
So I like to run retros in different formats. Still with the aim of giving team members a space to share their thoughts and look for ideas for improvement, but trying to keep the sessions interesting. This is a format that I’ve a lot of fun running.

The format
If you’ve ever played the game two truths and a lie, it’s a rip off of that! It’s a very simple retro format.
Go around the group and ask each team member to write on post it notes 2 truths and 1 lie about how they have found the teams’ efforts since the last retro. Once everyone has written their post its, pick a team member who will start the game. The person chosen will read out their notes and answer any questions about them. Then the rest of the team will guess which one is the lie. Then repeat for each team member.
Once everyone has had their truths and lies worked out, the team can then dot vote on what tickets they would like to discuss further.
When I’ve run retros in this format in the past, it’s nice to break out of the more common formats. I find that the limited number of tickets can also help focus the conversation rather than having a full board of tickets that need to be discussed and grouped.
Javascript generators
Generators are something I’ve not used much, so in order to understand them more I’ve been practising using them and here is my overview of them.
function*
To create a generator function, all you need to do is add a “*” after the function keyword.
function* basicGenerator() {
  console.log("This is a generator function");
}
By adding the star, the function will now return a Generator<never, void, unknown>
The returned generator will have a .next() function, which returns an IteratorResult<never, void>
The IteratorResult will be either an IteratorYieldResult or an IteratorReturnResult. Which will have the data returned from either a yield or a return under the value property and a “done” boolean which will return true once the generator has provided all of its results.
function* returningGenerator() {
  return 3
}

describe('Returning generator', () => {
  it('should return an IteratorResult', () => {
    const generator = returningGenerator()

    const result = generator.next()
    const secondResult = generator.next()

    expect(result.value).toEqual(3)
    expect(result.done).toBeTruthy()
    expect(secondResult.value).toEqual(undefined)
  });
});
A returning generator
In the example above, the IteratorResult will now have the type of IteratorResult<never, number> since the generator wil be returning a number.
Again in the above example, the second call of next will have a value of undefined and the done value will be true, as the generator has returned all of its results.
A yield generator
If you use the yield keyword in a generator, the generator will return results with a value for each use of the yield keyword.
function* yieldGenerator() {
  yield 1
  yield 2
}
In this example, the first two calls of next() will return the yield values then the third call will return a true value for done.
The result type will now become IteratorResult<number, void> as the generator is yielding but does not return.
Passing a value to the generator
Just as with other functions, values can be passed to the generator to be used within them.
function* parameterGenerator(input: number) {
  while (input < 2) {
    yield input
    input++
  }
}
Passing a value to next
The next function can also have parameters passed to it. To use the value within the generator, declare a variable on the left of the yield expression: const paramValue = yield val
To declare the type of the value that will be passed to the next function, set it in the third generic type for the generator.
function* nextParameterGenerator(input: number): Generator<number, void, number> {
  let val = 0
  let increase = input
  while (true) {
    const newIncrease = yield val
    val = val + increase
    if (newIncrease) {
      increase = newIncrease
    }
  }
}
Iterable
As a generator is iterable it can be used within a for…of loop to loop over the values.
let total = 0
for (const value of generator) {
  total = total + value
}
You can also use the spread operator to grab all the values from a generator
const values = [...generator]
Use cases for generators
Generators are good for lazily doing calculations on demand rather than having to calculate something fully up front. This can be useful for dealing with things like large ranges. Rather than creating a large dataset, holding it in memory, and then iterating over it, you can use a generator to calculate each value on demand.
They can also be helpful for when you don’t initially know how many values you will need. The generator will be able to be called on demand each time the next value is needed.
If you want the code to any of these examples, you can check out my repository here
Linked list
Honestly, I don’t think I’ve ever used the linked list data structure in the wild before. But I came across it when I was doing some coding practice the other day. I found it super interesting to learn a data structure that isn’t just the array that we often use.
So here is a blog post to cement the learning and create myself a reminder for the future.
What is a linked list?
A linked list is a data structure made up from a sequence of nodes. Each node has two properties; the data itself, and the pointer to the next node in the sequence. The linked list itself will also have the reference to the starting node, or “head”.
Example code
Here is an example node; with it’s “data” and “next” properties.
class ListNode {
    data: string
    next: ListNode | null = null
    constructor(data: string) {
        this.data = data
    }
}
Below are some example functions for a linked list.
Add: Adding a node to the end of the list
add(node: ListNode) {
    if (!this.head) {
        this.head = node
    } else {
        let nextNode = this.head
        while (nextNode?.next) {
            nextNode = nextNode.next
        }
        if (nextNode) {
            nextNode.next = node
        }
    }
}
Insert: Inserting a node at the start of the list
insert(node: ListNode) {
    if (!this.head) {
        this.head = node
    } else {
        const prevHead = this.head
        this.head = node
        this.head.next = prevHead
    }
}
Shift: Removing and returning the node at the start of the list
shift(): ListNode {
    if (!this.head) {
        throw new Error("Empty list");
    }
    if (!this.head.next) {
        const prevHead = this.head
        this.head = null
        return prevHead
    }
    const prevHead = this.head
    this.head = prevHead.next
    return prevHead
}
Pop: Removing and returning the node at the end of the list
pop(): ListNode {
    if (!this.head) {
        throw new Error("Empty list");
    }
    if (!this.head.next) {
        const prevHead = this.head
        this.head = null
        return prevHead
    }
    let prevNode = this.head
    let currentNode = this.head
    while (currentNode.next) {
        prevNode = currentNode
        currentNode = currentNode.next
    }
    prevNode.next = null
    return currentNode
}
Delete: Removing the first node that matches a given data value
delete(data: string) {
    if (!this.head) {
        throw new Error("Empty list");
    }
    if (this.head.next == null && this.head.data == data) {
        this.head = null
    } else {
        let prevNode = this.head
        let currentNode = this.head
        while (currentNode.next) {
            prevNode = currentNode
            currentNode = currentNode.next
            if (currentNode.data == data) {
                prevNode.next = currentNode.next
            }
        }
    }
}
Count: Return the count of the nodes in a list
get count():number {
    if (!this.head) {
        return 0
    }
    let nodeCount = 1
    let currentNode = this.head
    while(currentNode?.next) {
        currentNode = currentNode.next
        nodeCount++
    }
    return nodeCount
}
The full example code can be found here.
When to use it
Linked lists are a good data structure to use for things like ordered queues. When access to the list is done in ordered way. If random access to items is needed, a linked list can be inefficient due to having to run through each node.
They can also be efficient for adding data to the list. As each node stores the reference to the next node, inserting a new node at the start of the list or in the middle of the list, doesn’t need to move or update the rest of the list.
Summary
I’ve really enjoyed digging in to a data structure that I haven’t used much. While a linked list might not be the best choice in every situation, I always like to add new tools to my tool belt. I’m looking forward to learning more about some other data structures.
Facilitating a kata
Recently I’ve been lucky enough to have the opportunity to start running some coding katas within my team! I love facilitating katas, they prompt great discussions, it’s great practice, and it’s great when they take unexpected turns.
What is a kata?
The term “kata” comes from the martial arts world. It’s a set routine of movements that you practice repeatedly until those movements are solidified in to your muscle memory and come to you without having to think about them.
A coding kata is there to do the same thing. It’s all about picking the technique you want to practice and focussing on how you do it, until that technique is naturally at your finger tips.
Kata ideas
A good kata needs a technique to focus on, and a problem to solve.
Some of the classic problems to solve include Checkout Kata, the Bowling Kata, and the Roman Numerals kata.
For the Checkout Kata, you are to create a checkout that can scan multiple items and return a total value. If you want to take the session further you can add in discount rules such as, a discount when 3 of a certain item is scanned.
For the bowling kata, you create a bowling calculator that accepts the number of pins each turn and calculates the game total based on the rules of ten pin bowling.
For Roman Numerals kata, you create an application that takes an integer as an input and returns the corresponding Roman Numeral value.
It’s not the day job!
It’s important to remember that a kata isn’t your day job. It’s a time to learn and take the time to try new ideas and techniques. Especially if you’re doing a kata with other people, make sure you explore and talk about everyone’s ideas. It’s always super interesting to see how different people tackle the same problem.
The quality of the time spent during a kata is far more important than the quantity of the output. If a single line of code gets written but that prompts useful and interesting discussions, that is more valuable than completing any requirements.
Take the time to try different approaches to pairing or mobbing that you may not normally do. While not everything you try might make back to your day job, it’s always good to try and share different approaches.
Be strict in your approach
When doing a kata, I like to take the practices to the extreme. For example, I follow red, green, refactor to the letter. Think about what is the next smallest test that will drive out the design. Once you have that red test, what is the absolute quickest way to make that test green, no jumping ahead to the refactoring stage. If I find my self in a situation where I’m making changes while in a red state, I’ll back out those changes and refactor while in a green state. Obviously, the tests must be run frequently!
Go and practice!
There are loads of ideas and variations of katas out there to try. Go give them a go, and remember, they are for practice and for fun, so think about your approach and enjoy them.
Feel free to use my blank kata template to get you started.
Coverage Gutters - VS Code
Code coverage reports are super useful to help make sure your code is well covered by tests. However it can be difficult to make sure all of your lines and functions are covered when only looking at top level percentages. Tools such as NCrunch and Wallaby feature awesome line by line live code coverage. These are fantastic tools and worth the money, however if you’re working on personal projects you might not have the budget to use them. So here is a free way to get line by line code coverage for your Node or Typescript projects in Visual Studio Code.
Feedback loops with code coverage gutters
Feedback loops in programming are crucial. It’s great to have various feedback loops at different levels. Unit test coverage reports are awesome, but the feedback loop they provide is a step above the code. They are typically used within CI pipelines in order to ensure code coverage stays high from commit to commit. Even if you review the report as part of your development process, there is a disconnect between reading a report separately from the code you are writing.
By using one of the paid tools or the free Coverage Gutters plugin in Visual Studio Code you can make the test coverage feedback loop a little smaller by seeing it on a line by line basis. This will hopefully highlight gaps in your test coverage more quickly, hopefully making the gaps in coverage easier to close.
If you are developing using TDD (which I hope you are), this is excellent quick feedback to make sure you aren’t adding code that isn’t covered by the test you are trying to make pass and go green.
The plugin
The plugin I’ve found to get line by line code coverage is Coverage gutters. For Node projects it’s really easy to setup.
You’re going to need a lcov.info file for the plugin to pick up. With Jest, all you need to do is add the –coverage flag to your jest command.
jest --coverage
Once you’ve got a lcov.info file you’ll need to enable the plugin. You can do this for just your current file, but using the plugin with “Watch” will be much more useful as it picks up changes in your coverage file and applies it to all files.
You can activate the plugin via the “Watch” button on the status bar;

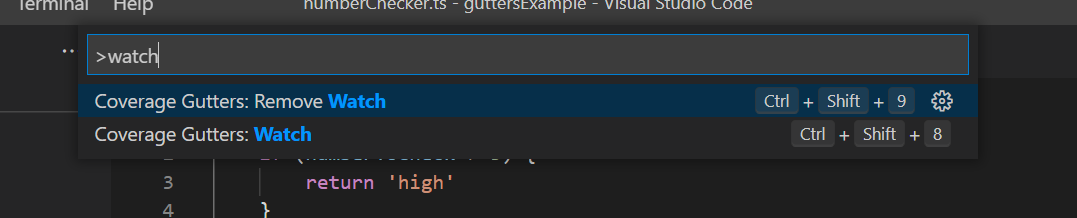
Or by selecting “Watch” in the command palette.
Then if you add the watch flag to your Jest command, your coverage report will continuously update which will be picked up by Coverage Gutters to give you that instant feedback.
jest --coverage --watch
Example repository
For a basic example of a repo ready to use the Coverage Gutters extension, you can use this repo I have set up.
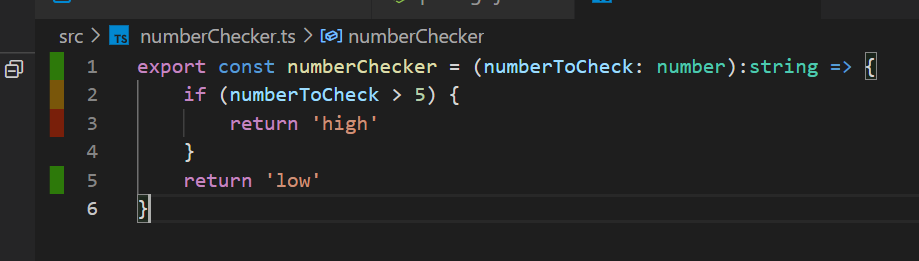
You can see the green lines that are covered by tests, the amber lines where the code path has not been taken, and the red lines that the tests are not covering at all.
Give it a go and keep those feedback loops small!