XP Manchester - Why isn’t XP the norm?
Recently I’ve been thinking about XP practices, such as TDD, and why they aren’t the normal practices done everyday.
Luckily, the nice people at XP Manchester let me run a 5 Why’s session in order to crowd source some great ideas.
Disclaimer: I’ve written up the session but in case I’ve remembered something incorrectly, I apologise to the group!
What is Extreme Programming?
Extreme programming is an agile methodology developed by Kent Beck. By taking practices that work well and taking them to the “extreme”, software development teams can deliver quality software in challenging environments.
For example, code reviews can help to increase code quality and share learnings by getting more members of the team to look at the code. Then constantly reviewing the code via pair programming can improve the value and frequency of those benefits.
You can check out more information on Extreme Programming here.
XP Manchester
If you’re ever in the Manchester area I definitely recommend checking out the XP Manchester user group. For more information on the kind of sessions that have been run there, you can check out their website here.
Over the years I’ve learnt a load from the XP Manchester user group. So I knew that by proposing the question “Why aren’t XP practices the norm?” to the group, I’d get some excellent answers and thoughts.
The session
Thanks to the pandemic and everyone being in lockdown, XP Manchester is currently being held over Zoom. I’d normally run a 5 Whys session using a whiteboard, but Miro came to the rescue.
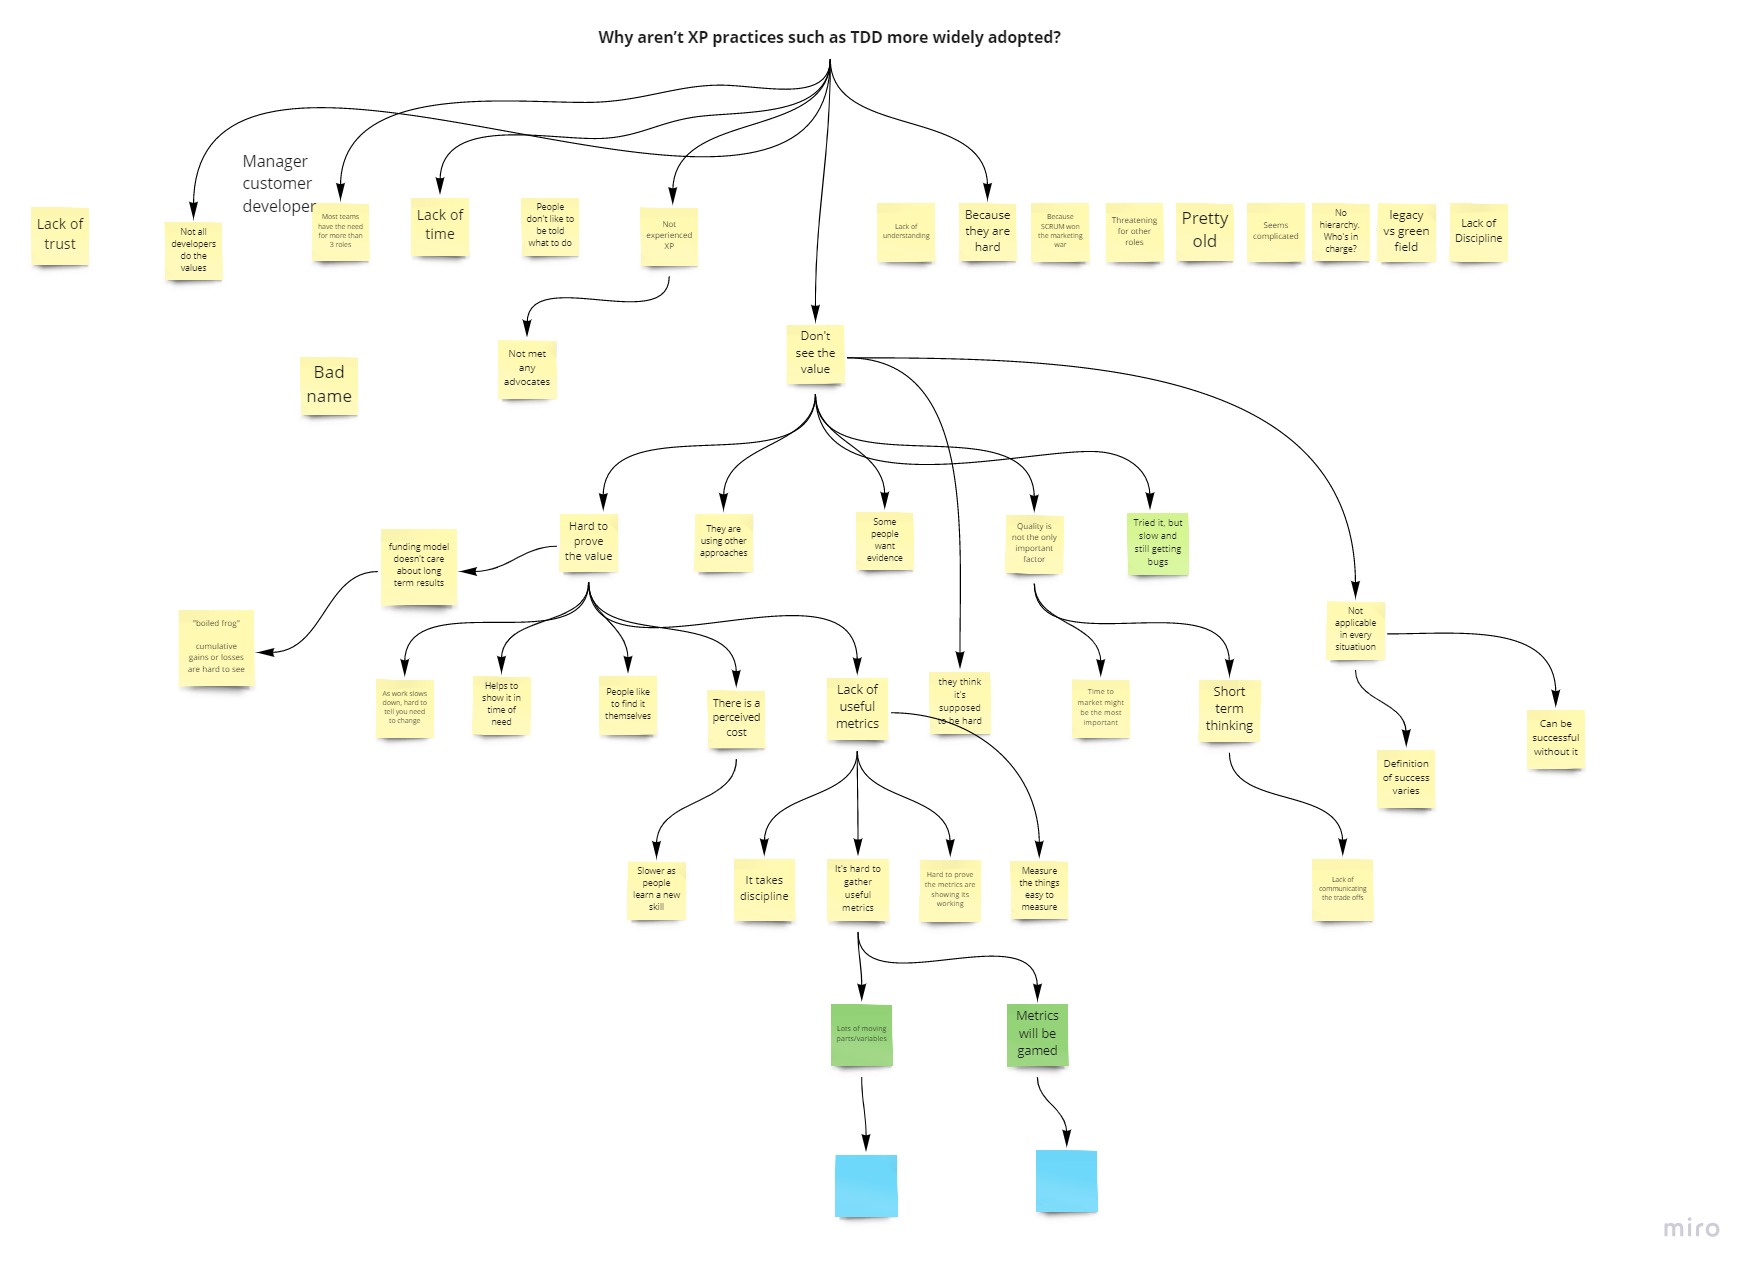
Using the 5 Whys format, as a group we tried to answer the question “Why aren’t XP practices such as TDD more widely adopted?”. Then for each answer, we would ask Why again. It’s usually pretty rare there is a silver bullet answer to a problem. So by repeating Why 5 times hopefully we should be able to break the problem down small enough to try and get some actionable ideas.
The XP Manchester crowd did not disappoint. The conversations around possible blockers to putting XP practices in to place was extremely interesting. Below you can see the output of the 5 Whys session.
XP Values
While the main question we were discussing was based around why aren’t the XP practices the default practices in use, the XP values were discussed as well.
There are 5 main values in Extreme Programming;
- Simplicity
- Communication
- Feedback
- Respect
- Courage
This post isn’t to delve in to values, if you want to read more around the XP values, you can do so here.
It was nice to see that in the discussion we struggled to imagine a scenario where the XP values weren’t good values to try and apply.
XP Practices
Some of the practices from XP include;
- Test driven development
- Pair programming
- Continuous integration
- Refactoring
Again, this post isn’t for delving in to those practices, but why aren’t they always used. For more information on XP practices, you can check out this post.
These are some of the practices that seem to be generally accepted that they are good practices to follow, but for whatever reasons, they aren’t always put in to action.
Some ideas
There were some very interesting ideas from the session as to why XP practices are not always put in to action. Far too many ideas to dig in to each one in the session, but definitely some points I’ll be taking away to think about. Such as, maybe some people haven’t met any XP advocates, Extreme Programming itself is pretty old, and some of the practices are difficult.
One of the main ideas that we dug deeper into was that some people don’t see the value in them. One of the answers to asking why again was that in some scenarios quality isn’t always the largest driving factor. I hope that any case where quality is sacrificed for speed is done so intentionally for extremely short time scales. Otherwise that lack of quality will likely end up costing more in time anyway.
The fact that it is hard to prove the value of following XP practices was another branch of the discussion. A lack of useful metrics was one possible factor to this. Metrics being difficult to define and measure is not a problem exclusive to XP, but it is definitely a hard problem to solve.
When exploring why it’s hard to prove the value of XP practices, the perceived cost of implementing them was touched upon. A lot of the practices are skills that take time to learn and build on.
Actions
Just as I’d hoped, by throwing the question out to the XP Manchester group, I’ve got some great ideas to take away and try make XP easier to implement.
Definition of success
The idea that sometimes quality isn’t the only definition of success really got me thinking about the impact of Extreme Programming on software products. I think following the XP values of communication and courage would help to clearly state with the wider team what success looks like. If quality isn’t the main definition, it’ll be super important to talk about timescales and what the longer term definition of success looks like.
Investment
The conversation at XP Manchester reminded me that for a team to learn new skills takes an investment. Again, leaning on the XP values should be a big help here. By clear communication of the benefits and costs of XP while ensuring we give and seek feedback, we should be in a better place to get that investment.
Embody the values
I thought going in to the session I’d be able to steal everyone elses great ideas about how they’d been able to implement XP practices. However, I think what I took away was even better. Focus on the values. The more I think about the XP values, the easier I think it’ll be to implement the practices.
Metrics give you the bad news
Firstly, I want to say that I think metrics are awesome. So while this post is looking at what metrics can’t do, there is an awful lot they can do. Being aware of the pitfalls of metrics can make them even more useful.
Example metrics
There are lots of metrics that you can use to support your development practices. Here I’m going to describe a handful of the metrics that I’ve found useful in the past, but also how they are imperfect and can’t be relied upon to paint the whole picture.
Test coverage percentage
A really common metric to use is test coverage percentage. It’s the percentage of lines of code that are covered by tests.
A lot of testing tools and frameworks make this a really easy metric to collect. For example, if you are using Jest, then you just need to add the –coverage flag to get an output like this.
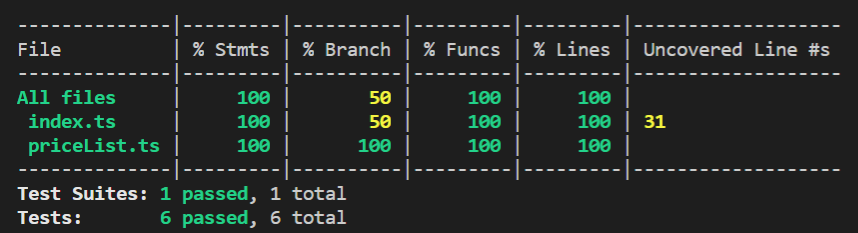
Tests are super important, so low coverage is a sign that you need to get more tests in place. However, coverage only shows what is covered by tests. It doesn’t show if the tests are actually useful.
Lead time
Lead time is a metric that I love to use. It shows the time it takes for a ticket to hit the backlog and then make it’s way to production. If your lead time is getting larger it may be an indication that work is flowing freely and quickly through your development life cycle.
A small lead time is great as new ideas can be realised quickly in order to create value. However, a small lead time doesn’t necessarily mean that you are adding value.
Velocity
You can calculate your velocity by measuring how much work you can deliver within a period of time. You can measure it in number of tickets, story points, or whatever makes sense for your workflow.
It’s great to be able to deliver a lot. So tracking velocity can be really useful. A low velocity may be a sign of a bottleneck in your processes. But a high velocity can give a false positive impression if tickets are sliced too small or your way of measuring velocity is inflated.
What metrics can’t do
As we’ve seen a metric can be cheated, purposefully or not. You can’t take a metric on it’s own and have a full understanding of the why. They are only an indicator.
What metrics can do
While a metric having a good score doesn’t tell you very much, they are still super useful and important.
When one of your metrics doesn’t have a good score, it’s not going to tell you exactly what is wrong, but importantly it will tell you that something is wrong. Just like a code smell, it’s an indication that there is a problem, but you’ll still need to find it.
How to pick and use your metrics
Since metrics are there to give you the bad news, you should be picking metrics to highlight issues that you want to avoid. For example, you don’t measure test coverage because you want to see how high it is, you measure test coverage to act as an alert if you are missing tests.
Unit tests for the whole team
I don’t think it’s possible to overstate the importance of unit tests. Ideally they’d be created through following test driven development but that’s a whole different conversation.
But by sharing your unit tests with your team, through HTML reporters you can get even more value out of them as living documentation.
What unit tests do
A strong set of unit tests gives several huge benefits to a system.
For example, unit tests allow for small feedback loops of testing the whole system, reducing the need for full manual regression tests for each code change. In turn, this increases the confidence that code changes won’t break the system.
Similarly, refactoring would be very difficult without unit tests. Without your tests to rely on, you would be spending a lot of time manually testing your system after every code change.
A sometimes overlooked benefit of unit tests is the living documentation that they can form. By reviewing the test suite it should be clear what the system does.
Living documentation
Often, tacit knowledge and knowledge silos grow over time within a team. Moving that knowledge out the developer’s head into a more public realm is hugely useful.
Documentation is great, with one major caveat, only when it is kept up to date. Keeping documentation up to date is easier said than done. For every change to the system, making sure it is reflected in the documentation can be a considerable overhead. Especially when changes need to be made quickly, this overhead is easily and often overlooked. Incorrect, or outdated documentation can be very damaging.
An ideal situation is where the documentation is based on the code itself. A strong set of tests that test the behaviour of a system can form living documentation. You should be able to read through your test suite and know exactly what the system does and how it will behave in various scenarios.
Jest reporters
A strong set of tests that form living documentation of the team should benefit more than just developers. All members of the team should have access and be able to benefit from the documentation.
If you’re using Jest as your testing framework, you can help all members of the team use the tests through using a Jest reporter.
There are various types of jest reporters that are available. Dot reporters, reporters that show the slowest tests, reporters that show skipped tests, etc. You can even write your own reporter. Check out awesome-jest for a list of useful reporters, and other great jest tools.
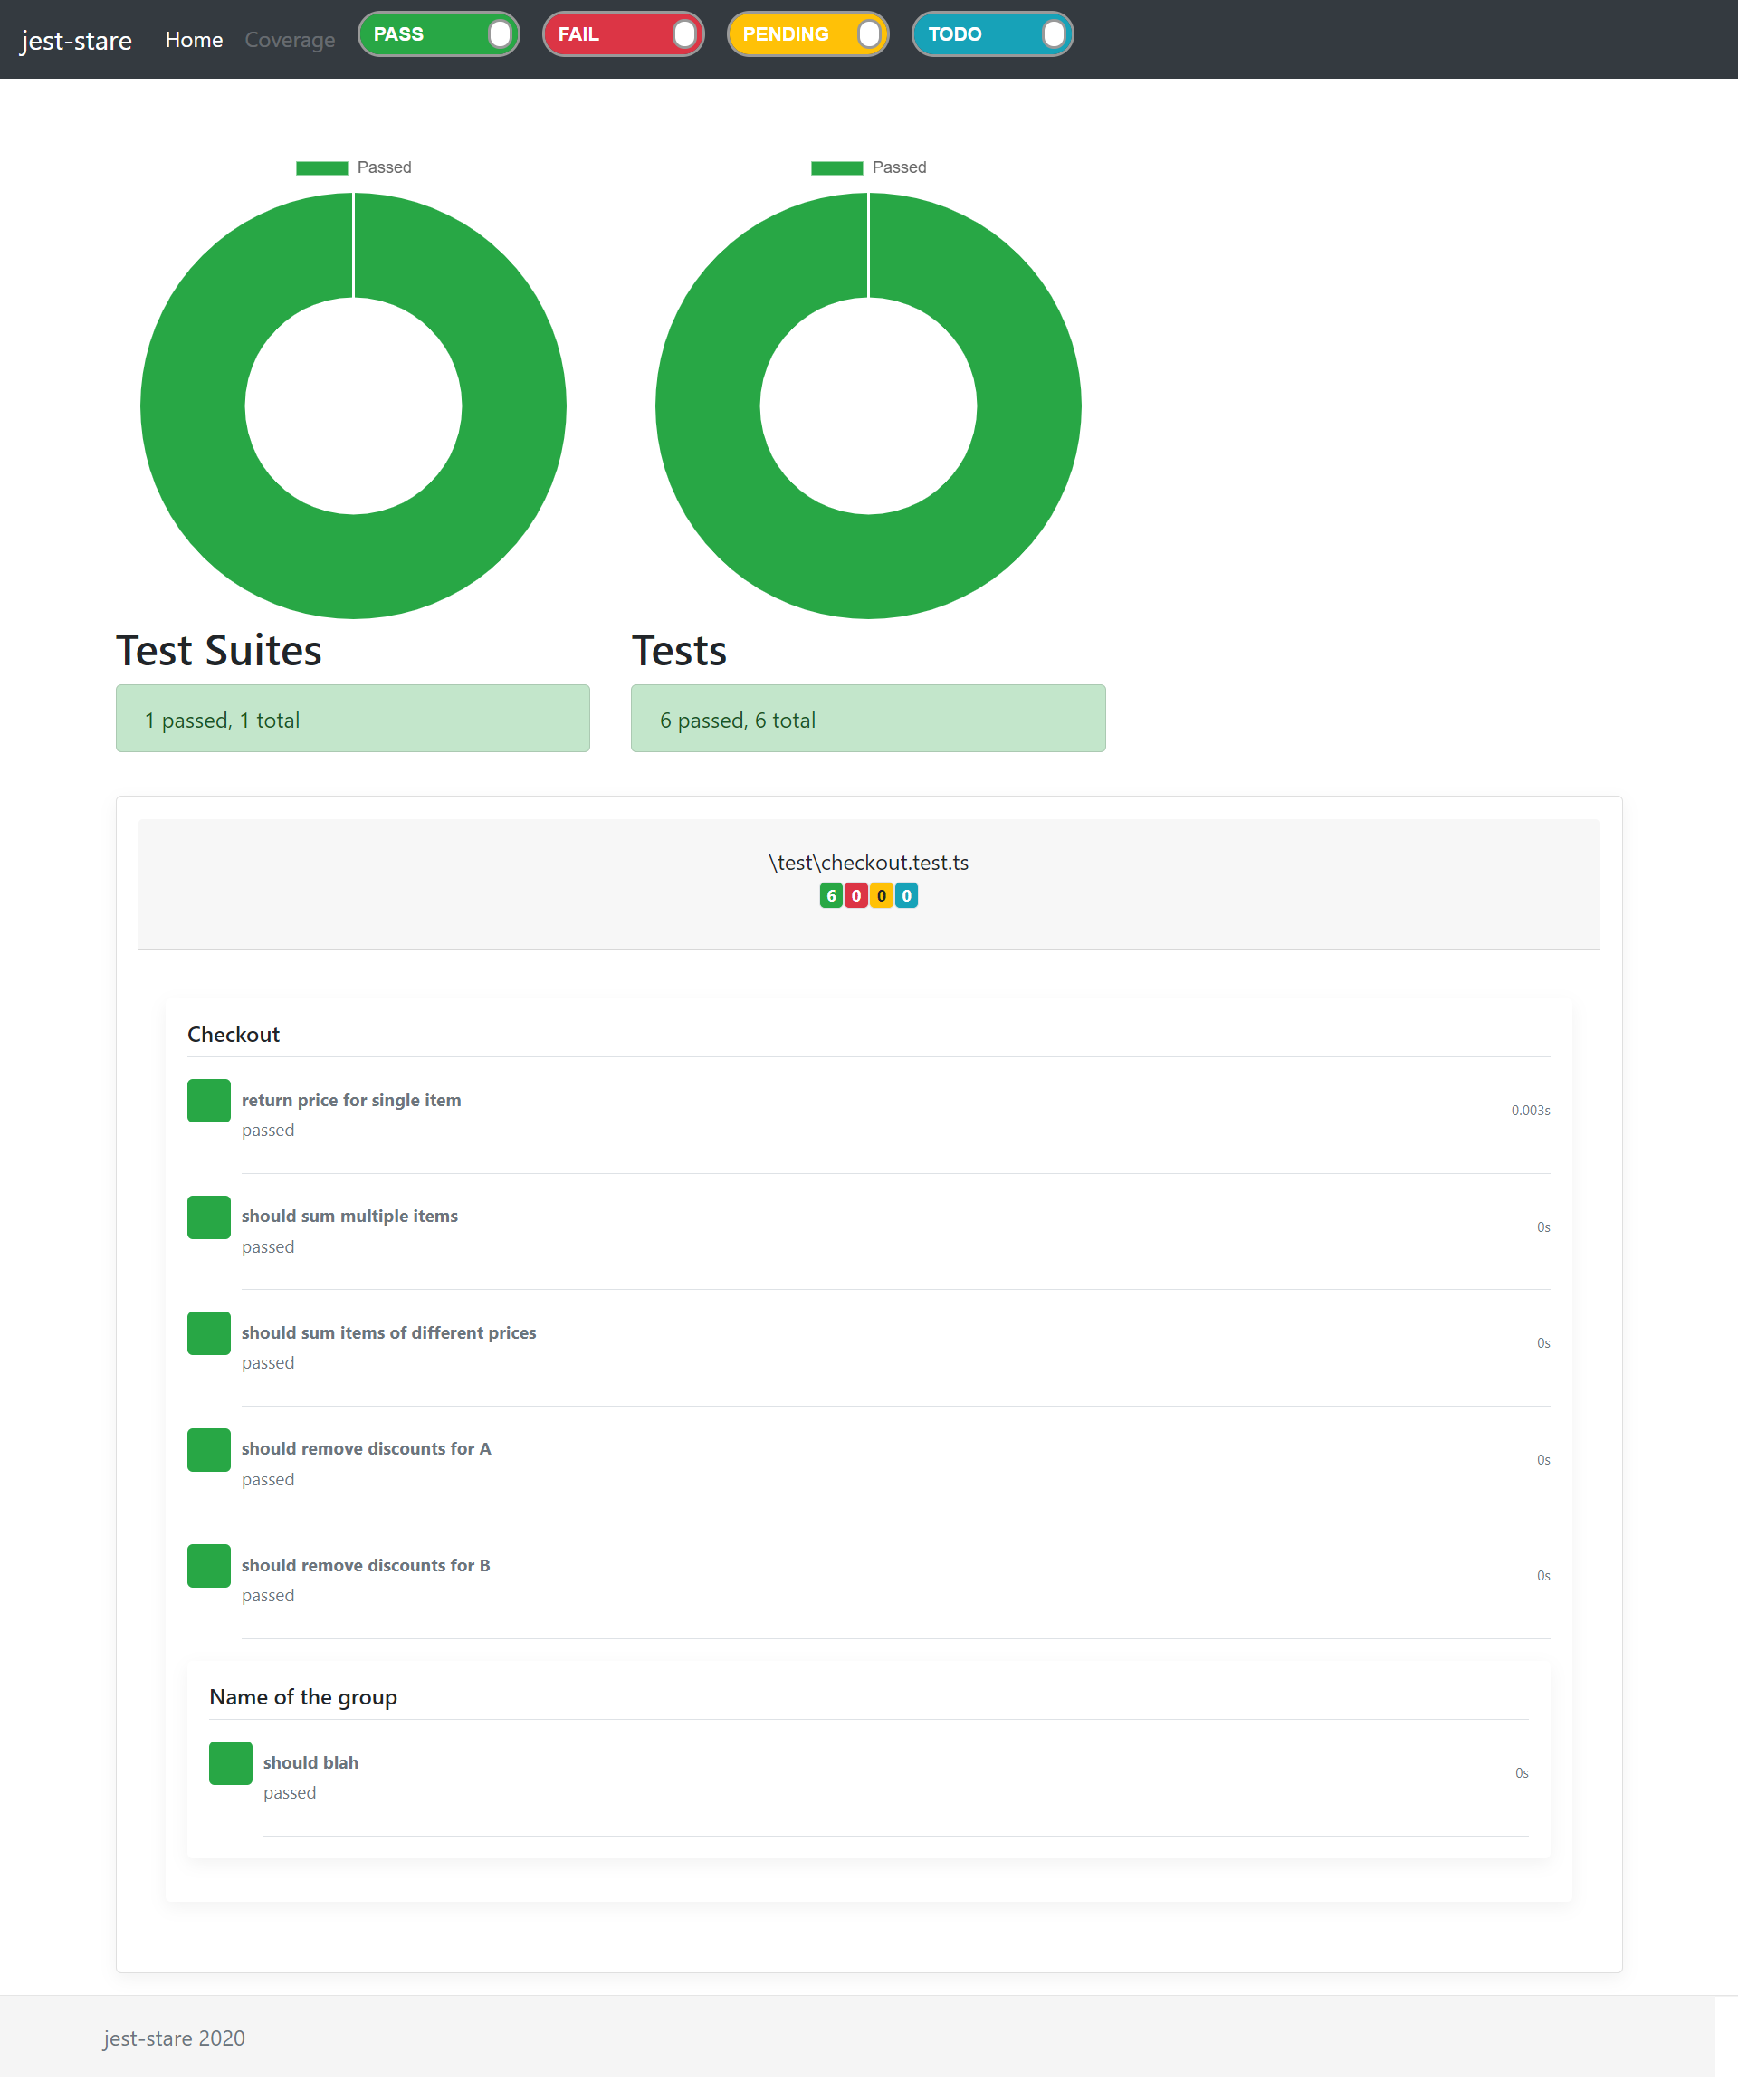
For making a test suite available and useful to the whole team I was interested in the html reporters. The three I played with were;
Honestly, I was impressed by them all. They were all easy to setup, and all produced a nice html report that was easy to share and read.
To set up a reporter and use the defaults, all you need to do is import the package
npm install jest-stare --save-dev
Then add the reporter to the list of reporters in the jest config, for example
module.exports = {
    verbose: true,
    reporters: ["default","jest-stare"]
};
Once your tests have run, the reporter will output an overview of the tests.
Collaboration
So you’ve got your test suite, your tests are well named and test the behaviour of the system (not just a reflection of the code), and now you’ve got your nice html report for your tests. Make sure you use it!
Share it with the wider team, ideally as part of your CI process. Maybe email it on each deployment? Maybe host the report somewhere so people can access it? However it would work for your team, but make sure all members of the team can see it some how.
This effort of transparency of the system should give a lot of value. If anyone has any questions about what the system does, they now have living documentation they can refer to!
Local npm package
A small blog post just to serve as a reminder for myself (or anybody else) on how to reference local npm packages to help keep feedback loops small during development.
Why
I’m not the most patient person in the world, so anything that lengthens feedback loops I find a real pain.
Recently I was making an npm package and I wanted to be able test it as I went along. Especially as the package wasn’t ready to be deployed to npm. So I wanted to be able to reference the package locally.
How
To reference the local package, all you need to do is to add it to your list of dependencies with the following syntax. Making sure that the file path is the package.json of the package you want to import.
"dependencies": {
    "packagea": "file://../packageA"
}
After running npm install, you can the require/import your local package just like you would with a published package.
Accelerate
Accelerate is a great book that describes characteristics of high performing software delivery teams and organizations. I’d definitely recommend reading it to get some great ideas to try with your team.
Who should read this book
Since this book shows how different techniques and practices can help teams to be high performers, this book should be read anyone who has an interest in the performance of their organisation.
If you are a leader within a software delivery team or a manager in a company that want’s to support high performing teams, there is some great advice on how you can be an enabler for improvements.
Not just agile practices
I’m a huge fan of agile practices. I think it’s super important to think about not just the software you are delivering but also, how you deliver it.
I’ve seen how agile practices such as Kanban or lean product techniques can help you deliver more value quickly. However, in order to deliver high quality software, agile practices can’t do it alone, you need to remember the software part as well. It was really refreshing for Accelerate to go in to detail around technical abilities of teams and software practices in order to gain an advantage.
Metrics
Having reliable metrics to measure the performance of a team is hugely important. Without good metrics to track, you wouldn’t be able to measure if your actions are helping to improve the output of the team.
Cycle time is a great metric to use to measure the performance of a team. If the time it takes a team to take a feature from getting requirements, through the development process, and into a production environment is being shortened, then the team is likely to be working in the right direction.
Accelerate does a great job of outlining and explaining several metrics that can be used to measure the performance of a software delivery team.
Research techniques
Several of the chapters in the book are around explaining the research methodologies that went in to the writing of the book.
These are helpful chapters as they help to give the answers in the book validity and explanations over simple anecdotal evidence.