Practice makes Perfect - Lean development
Here’s how and why I built my last app following lean principles - Practice makes Perfect
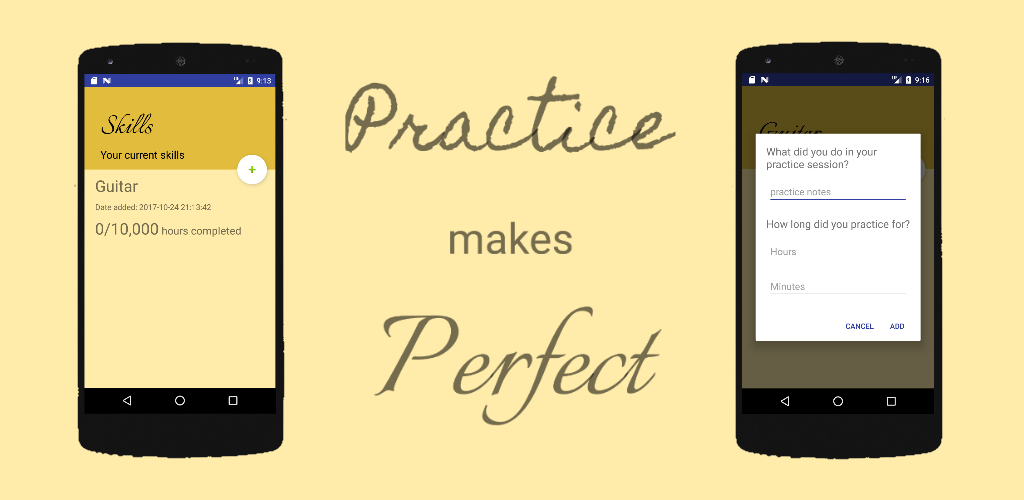
The app
My new app “Practice makes Perfect” is designed to be a tool to be used when learning a new skill. There is a theory that puts forward, if you practise something for 10,000 hours you become an expert in that skill. Practice makes Perfect, aloows you to keep track of your practise sessions by recording each one and totalling up your overall time practising time.
I came up with the idea for the app while learning my own hobbies. While playing the banjo I was wondering how long I had been learning it for overall.
Why build a personal project following lean principles?
To some it might sound strange to build a personal project following lean principles. I’m the developer and the client who will be signing off of designs and functionality. Why not just build the whole thing right?
True, one of the feedback loops is removed, but the others are still there and other constraints such as budget were very important to me on the project.
Is there interest?
One of the most important pieces of feedback I wanted to get early was, would anyone else find an app like this useful?
The quicker I got the core mechanic of the app out and getting feedback from it would tell me if this was a good idea for an app or not.
Budget
This was a personal project being built in my own time, so while there wasn’t a team of developers/designers/product owners to pay for, it was costing me the most precious resource, my time.
It didn’t take me too long to get the core of the app working but I felt I had to do at least a little design work before I could release the app. Trying to make it a minimum likeable product at least.
If the app recieves any interest at all, I would be happy to extend the budget (my time) on this project, but until then, I’ve set a budget, met it, and now waiting for feedback.
Holding back
Not going over budget was actually surprisingly difficult. During the initial build I had lots of ideas for extra features on the app. For example, the ability to add evidence of your practice sessions, such as images and video. I think this is a good idea, but doing that would have extended the budget to get it released. If anyone starts using the app then I can justify increasing the budget.
Another example of waiting to see if new features are needed is the ability to remove practice sessions and skills. As soon as anyone is using the app this seems like an important feature to add. However, if no one is adding and skills or practice sessions, there is no need to be able to remove them!
Feedback
I’ve already recieved some feedback on the app. Mainly that I need to learn how to promote an app without any budget!
Another piece of feedback that I got early from releasing quickly was that the icon I just generated in Android Studio isn’t the best. Not the most constructive piece of feedback in the world, but it’s a learning I can apply to this app or at least take in to my next project.
Next steps
It’s still early days in the app store but it’s not looking like Practice makes Perfect will be reaching the top of the app store anytime soon.
As such, I’m really glad that I set myself a budget, stuck to it, and got some learning from releasing. Spending more time now adding features isn’t likely to increase the take up rate of the app so it doesn’t seem wise to build those extra features yet.
The most likely next step for the app would be start trying to gain some qualitative data on how/why someone would be looking for an app like this in the app store. People who hear about the app agree it’s a good idea but now I need to understand what would convince them to download it. If you would like to try Practice makes Perfect, download it here.
If I can’t come up with a plan to increase downloads then I’m ok dropping the project where it currently is. Thanks to the lean approach not a lot of time/money has been wasted and learnings were made, so if the idea ends here, I’m not overly invested in it.
Trunk based development debate
Recently I had the opportunity to take part in a debate of trunk based development vs branching. Here’s how it went.
What is trunk based development?
In trunk based development all developers work only from the trunk or master. No branches are created for feature development or releases. You work on master and release from master.
Other factors may influence exactly how this is implemented though. For example, depending on the team size and composition, you may create short lived branches for peer reviews or pull requests. However, it is important that the spirit of trunk based development is still observed and these branches are short lived.
For more information on trunk based development, here is a great website explaining it in much more detail.
My arguments for trunk based development
XP principles
When pulling together my arguments for trunk based development it occured to me that this sort of source control strategy supports several of the XP principles.
Collective ownership
Since when following trunk based development, every commit should be going to the master branch which in turn will be checked out by every member of the team and break the build for everyone if there is anything wrong, collective ownership sort of just happens. If you leave broken tests, you aren’t just affecting yourself, you are affecting the whole team. This quickly promotes care and attention to the work and others in the team.
Continuous integration
You should set your continuous integration pipeline to be built from commits to the master branch. If these commits are coming from every member of the team and going through continuous integration, you should always be in a position where a release to live is possible.
Small releases
By working in branches you are working against the principle of small releases. Even if you keep those branches relatively small you are going against the spirit of small releases. If commits need to be gathered together in a branch for something like a feature, then by definition these are bigger releases.
In an ideal world, each commit would be going straight to live through your continuous integration pipeline, in turn ensuring small releases. However, even without automated deployment, avoiding feature branches is a great way to avoid large releases.
Sustainable pace
By avoiding the large releases and gaps between deployments, trunk based development can definitely support a sustainable pace of development. The ideal is small incremental commits that you would always be happy for to go to live.
Presentation example
To highlight the point we compared using Google slides to Microsoft powerpoint if there was more than one person preparing a presentation.
Using Google slides that saves every small change to a shared document helps promote collaboration and communication. Compared to where if more than one person were working on the same Powerpoint presentation they would each keep their own copy, or branch, of the presentation. This could result in there being bigger gaps between each contributor seeing what the others are doing, resulting in confusion when the multiple presentations needed to be combined.
The rebrand problem
One argument I have been presented with before is what I call the rebrand problem. The argument goes, when you are doing a big change such as rebranding a website then you need to do that work on a branch as you don’t want to block releases for that amount of time.
However I would argue this is the wrong approach. Firstly I would be looking to carry out some prefactoring on my code. Make changes that may not have any direct changes to the end user but that make the code more flexible and easier to change. For example, making sure all colours in the app are managed in one place, by using Sass variables for example.
Although I would prefer to avoid large changes altogether and deliver the work incrementally. For example, looking at Amazon’s front end changes over the years, I would say the design has evovled incrementally rather than large step changes.
Conclusion
Overall I would say that there are some instances where trunk based development can help, such as when you are supporting multiple versions on an app. However, I would imagine that if a branching strategy is helpful, then there are likely to be further underlying issues that you should also be addressing.
Five Whys Retro
The Five Whys technique is a tool to help in root cause analysis and I thought it might be a good excercise to try out in a retro.
What is it?
If you want to get to the root cause of the problem, you ask yourself why something has gone wrong. Then to that answer, you ask why again. The theory is, once you have repeated that process five times you will have a better understanding of the root cause of the problem.
Not all questions will have a single answer, and this is fine, but then you should ask why to each subsequent answer. This is why I find it helpful to document a Five Whys excercise as a tree diagram
As with any tool or technique, it’s not perfect. It may not give you a silver bullet answer and it relies upon the people involved to think of the causes and not the symptoms but anything that can help you think and frame a problem is good for me.
How it went in a retro
To start I had everyone write post it notes of things they felt could have gone better since the last retro. Then we each had two votes to decide on which post it we would discuss. That point was then the basis for our Five Whys activity.
It was really interesting putting Five Whys in to practice. The questions very quickly started giving more than one answer. As a team we decided which branch we wanted to follow and keep questioning. It was surprised how much information came out when the conversation was guided by the Five Whys technique.
Once we had got to the fifth why I felt that the actions we were taking away were focused, small, and addressing the root cause of the problem. While they might not fully resolve the initial problem, as they are only addressing one of possibly many root causes, I feel having a small focused action that will be a step towards solving the problem is a good thing.
The response from the team after the session seemed pretty positive. I think it was helpful to frame the conversation around the model. Or at the very least, sometimes it’s good to try new retro formats to keep things interesting.
If anyone else has any good ideas for retros, please let me know. It would be great to hear some new ideas.
Refresh Android Debug Bridge Keys
I’m not an expert about the Android Debug Bridge (adb) at all, however this issue cost me a couple of hours to resove the other day so I thought I would write this to remind myself if it happens again.

What is adb
The Android Debug Bridge is a command line tool that lets you interact with both virtual and physical android devices.
For example you can press the power button on the device via the command line.
For more information on adb, check out the Android docs.
What was my problem
When trying to attach a phone to debug via USB I wasn’t getting the prompt to trust the computer’s RSA key fingerprint. This meant that the device was not being authorized in adb. As such, debugging and running Espresso tests was impossible.
After trying the usual switch things off and on again and trying a different wire I was still having no luck.
How I fixed it
I read that if the RSA key for adb is not correct then the device will not be able to trust the computer and won’t connect.
Regenerating the keys is easy by following the following steps
Delete the old keys
For Macs the keys are found in;
~/.android/adbkey
~/.android/adbkey.pub
On Windows they are found;
C:\Users\{username}\.android\adbkey
C:\Users\{username}\.android\adbkey.pub
Call the adb commands
If you don’t have adb added to your path, you will need to call adb from the right location;
For Macs;
~/Library/Android/sdk/platform-tools
For Windows;
C:\Users\{username}\AppData\Local\Android\sdk\platform-tools
Once the keys are deleted, calling the below commands will stop the adb server, restart it, and regenerate the keys.
adb kill-server
adb devices
Mockito example
Yet another post about testing.
Recently I’ve been working mainly on Android projects using Java so I decided I needed to learn how to write tests in Java. For a mocking framework, Mockito seemed to be popular. I’m most familiar with NSubstitute so the syntax of Mockito seemed pretty strange at first, so before I forget it all I’ve made myself a cheat sheet.
Dependency
To start using Mockito, you need to add it in as a test dependency to your gradle script.
dependencies {
  testCompile "org.mockito:mockito-core:2.8.47"
}
Further details on Mockito can be found here.
RunWith
To help keep your tests clean, use the Mockito test runner annotation with your test class;
@RunWith(MockitoJUnitRunner.class)
public class MockitoExampleTest {

}
Further details on the test runner can be found here.
Test
Creating a test is pretty straight forward; you just need to add the Test annotation to method within the test class.
@Test
public void MyTest(){

}
mock
To create a mock, there is the static mock method.
IExampleInterface exampleInterface = mock(IExampleInterface.class);
when
If you need to setup the mock to return values there is the static when method. You first specify which method you are setting up then use thenReturn to set which value you want to return.
int expectedInt = 1;
when(exampleInterface.GetNumber()).thenReturn(expectedInt);
When the method being setup has parameters, you can use exact values as the expected parameter.
String expectedString = "a string";
int inputNumber = 2;

when(exampleInterface.getString(inputNumber)).thenReturn(expectedString);
If you don’t need to be exact with the expected parameter, you can use the Mockito matchers. For example;
String expectedString = "a string";
when(exampleInterface.getString(anyInt())).thenReturn(expectedString);
Assert
Mockito plays nicely with JUnit assertions, so you can just use the standard JUnit assertions. For example;
ExampleClass exampleClass = new ExampleClass(exampleInterface);
String result = exampleClass.getResult(inputNumber);

Assert.assertEquals(expectedString, result);
verify
Verify is used to assert against the methods on a mock. You can check if a certain method was called, how many times, and with what parameters.
verify(exampleInterface, times(1)).getString(anyInt());
Captor
Captors can be use to capture the values that are passed as arguments to your mocks for further assertions. I have found them to be pretty useful for testing callbacks as you can capture the callback value, then call it in your test.
For example, you can use the Captor annotation and create a field in your test class for the captor.
@Captor
ArgumentCaptor<IHandleCallbacks> argCaptor;
Then using verify and .capture(), you can get the argument that has been passed to a mock.
verify(callbackClass, times(1)).doSomething(stringCaptor.capture(), argCaptor.capture());
Using getValue(), you can then get the value from the captor to either verify directly or in the case of a callback, call the method and assert againt what you expect to happen once the callback is called.
IHandleCallbacks callback = argCaptor.getValue();
callback.handle(1);
Example
I’ve made a small example repository on GitHub for reference.