React Native Expo
I’ve been meaning to take a look at React Native for a while, but I’ve been pushing it back due to how good web apps are now.
However, the new year is bringing with it the urge to learn and make something new.
What is React Native
React Native is a framework for building native mobile applications using a single codebase. After working with mobile applications and trying to keep both an iOS and Android code base inline, the lure of just having one codebase to maintain is pretty strong.
What is Expo
Expo is a set of tools for helping to create React Native applications. With it being the suggested tool from React Native docs, it seems to be the best way to start and maintain a React Native application.
Not Git Bash!
Setting up the Expo CLI and getting your first application running is super easy. The instructions can be found here.
One piece of advice that had me stumped for a little while though; don’t use git bash! The expo init command doesn’t work with git bash, but it works just fine with cmd.
Testing on a phone
I’m far from an expert but I do have some experience with native Android development. Running your local application on a device feels a lot smoother than I remember Android Studio feeling.

By running ‘npm start’, Expo wil start up and give you a QR code to scan. Scanning this with the Expo client app will download the Javascript for your application.
This is so much quicker and easier than starting up Android Studio, enabling your device for debugging, and connecting physically.
Tunnel not LAN
Expo is really impressive when it comes to testing on a device, scan the QR code and you’re off.
However, it turns out it is not idiot proof. You can choose to access the app through your network or through tunneling. For a while I couldn’t get it to work through the LAN option on my network. But then I remembered that my router has two channels, it helps to have devices on the same network when trying to connect via the network I guess.
React Native Debugger
Another feature that really impressed me were the debugging capabilities.
Initially I assumed it would be easiest to debug the application with some text on screen, but React Native allows you to debug on your computer.
Shake your device to bring up the developer menu and select remote debugging to use the chrome developer tools. For other debugging options check out here.
First thoughts
React Native has massively impressed me. I’ve not gone deep in to it yet, I’ve not had to drop down in native code or anything, but if I needed to make a mobile application this would defintely be my starting point now.
My next big challenge though is to come up with an app idea to make my millions!
New Year
It’s been a while since I’ve written a blog post.
I’m not normally one for putting a lot of stock in to the new year. However, this year I’m excited for the year to come and learn new things.
GraphQL, AWS and agile processes are all things I’m aiming to further my knowledge in.
Good luck to everyone for 2019!
Unity - 2D Velocity
While making my latest game I wanted to move a sprite that was attached to another sprite via a hinge joint. However I realised that just moving the position of the original sprite’s transform would make the joint fail.
So here is how I added velocity to the sprite to ensure the hinge joint worked appropriately.
Add the velocity
I set a Vector3 for where I wanted the sprite to move to then set the velocity on my RigidBody to equal the Vector3 multipled by a speed value.
Vector3 movement = new Vector3 (-3, 0.0f, 0.0f);
rigidBody.velocity = movement * speed;
The speed value is a public variable so it can be easily set from the Unity editor.
Stop the velocity
Since adding velocity will be using physics within unity, the RigidBody will keep moving even after you stop adding the velocity.
For my game I didn’t want to rely on drag to stop my RigidBody, I wanted a more instant stopping. As such I had to reset the velocity.
rigidBody.velocity = Vector2.zero;
Unity - action while button pressed
I usually make games to be released on the Andrid platform and my UI usually involves buttons that have to be held down in order for something to happen. For example, the player character should walk forwards while the move button is held down.
Here is how I achieved this through the event trigger system and public methods on my scripts.
Public methods
Since Unity uses C# as it’s scripting language methods can be marked as public or private. In order for something outside of the script to call a method we have to mark the method as public. We do this like below;
public void DoSomething()
{
}
Using the event trigger system
The way I’ve been moving my sprites in my games may be to move the position of the transform of the sprite by using methods should as MoveTowards. Such methods will want to be called continuously as the button is pressed. In order to achieve this I create a private boolean field in the script, such as;
bool moveForward;
Then in the FixedUpdate method of the script you can check if the bool is true and if it move your player as desired.
void FixedUpdate()
{
  if(moveForward)
  {
    // move player as desired
  }
}
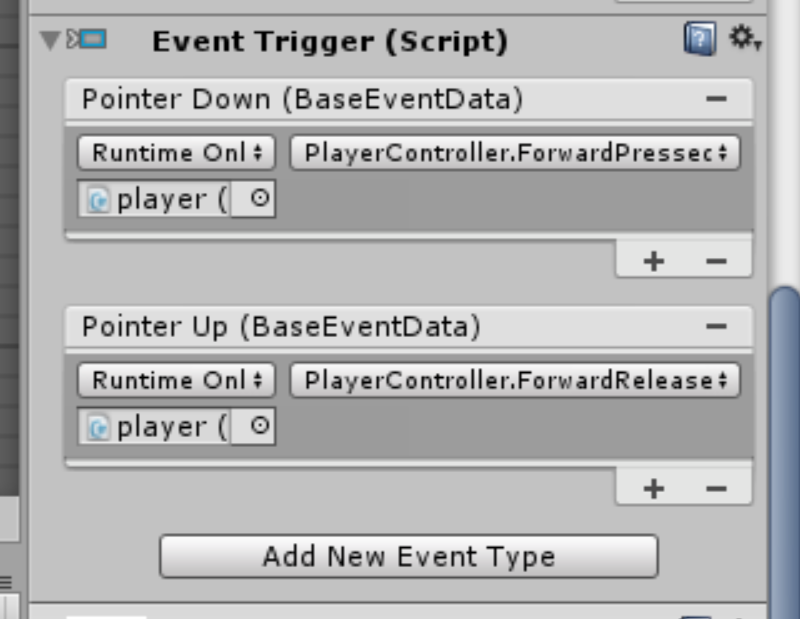
In order to set the moveForward field to true I use the event trigger system to call a public method on the script. So for the Pointer Down event on the Event Trigger component, within the button game object, call;
public void MoveButtonPressed()
{
  moveForward = true;
}
and for the Pointer Up event, call the method to set the boolean to false;
public void MoveButtonReleased()
{
  moveForward = false;
}
Adding the instance of the script
The final point is just a reminder to myself since I often forget.
You need to add an instance of a script that you want to call and not the script itself. For example, you add the game object to the event trigger that your script is attached to, not just the script.
Piskel - Pixel Art
In my attempts to learn game development I thought I better give pixel art a go.
I used the AMAZING web app Piskel for my first efforts. As a non-artist and knowing nothing about pixel art before starting, I found Piskel to be the perfect place to start. Check it out here
Piskel
Piskel is an online pixel art creation tool. It has an amazing selection of tools and options to get you up and running creating your first pixel art attempts quickly and intuitively. While I am defintely NOT an expert, I found I could get something together pretty quickly.
You get the usual sort of tools that you would expect from a simple drawing package; line tools, shape tools, selections etc. Though Piskel really came in to its own for me though in its layers and frames.
In each frame you can set layers as you would in other drawing programs. I found this to be massively useful when atempting to animate my pixel art. Once you are happy with a frame and ready to create a new one you have a few options to speed up the process. You can clone a previous frame, flip it, crop it etc. These might not seem impressive to someone who knows what they are taling about but I found them massively helpful.
My first attempts
As I’m sure I’ve said already, I am not an artist, so unsurprisingly my first attempts were not the most successful.

I was trying to make a character for a game I’m working on and I think I may have started out a little too ambitiously.
However, it is so quick and easy to start and make a new project in Piskel it really doesn’t matter if you are rubbish like me.
Animation
For me, the thing that makes Piskel stand out so much was the built in animation tools.

You have the ability to create frames to build up animation which is great. But Piskel will also preview the animation for you automatically. You can even set the number of frames per second in your preview.
I found these tools to be very helpful to keep my designs on track so I didn’t have to keep exporting them and turning them in to animations within Unity.
Once you are happy with your animation you can then export it in various formats such as a GIF or as a sprite sheet. Since I was importing mine in to Unity I went with the sprite sheet option. On importing in to Unity I found no problems at all.
I’ll do another post about how to use the sprite sheet in unity another time.
Amazing
I can’t recommend Piskel enough. For someone totally new to pixel art like me, it was really daunting on how to go about getting started. However Piskel’s easy to use interface let me concentrate on trying to make something cool rather than learning a new piece of software.
Go try it!