Planet proto solution
Continuing to work through the awesome nodeschool.io tutorials I decided I needed to know more about the javscript object model, so here are my solutions to the Planet Proto workshop.
This was a really useful set of tutorials, it felt like it filled in a big gap in my javscript knowledge.
Each lesson in this tutorial comes with a handy boilerplate file that explains what is required and you need to fill in the results in the test assertions.
Simple Objects
Lesson one explains the easiest way to create an object in javascript; using object literals.
// -> Create an object called 'robot' using an object literal
// -> robot should have a property 'smart' with value true
var robot =  {
    smart: true
}

// -> Claim the result robot.smart
claim(robot.smart, true);

// ------------------------------------------------
// Common JS exports for verification, don't modify
module.exports = {
    robot: robot
}
Proto
Lesson two goes on to explain about the __proto__ object. While usually supported, its behaviour has only been standardised in ECMAScript 6 as a legacy feature and changing an objects prototype is a very slow operation. So while its not advised to use, its good place to start learning about the object model.
One object can be set as the prototype of another. This allows for the properties of the prototype to be available on the parent object.
You can check the prototype of an object with the .isPrototypeOf() function which returns true/false.
/* global claim */
// -> Create a machine object
//    with a property motors = 4
var machine = {
    motors: 4
}

// -> Create a robot object
//    with a property friendly = true
var robot = {
    friendly: true
}

// -> Create a robby object
var robby ={}

// -> Make machine the prototype of robot
robot.__proto__ = machine;

// -> Make robot the prototype of robby
robby.__proto__ = robot;

// -> What is `robby.motors`?
claim(robby.motors, 4);

// -> What is `robby.friendly`?
claim(robby.friendly, true);


// ------------------------------------------------
// Common JS exports for verification, don't modify
module.exports = {
    machine: machine,
    robot:   robot,
    robby:   robby
}
Dynamic Lookups
Properties can be added to the prototype at any time and those properties will be available on the parent object.
// -> Let's define three objects: 'machine' 'vehicle' and 'robot'
var machine = {}
var vehicle = {}
var robot = {}

// -> Make machine the prototype of vehicle
// -> Make machine the prototype of robot
vehicle.__proto__ = machine;
robot.__proto__ = machine;

// -> What is `vehicle.motors`?
claim(vehicle.motors, undefined);

// -> What is `robot.motors`?
claim(robot.motors, undefined);

// -> Define a 'motors' property on machine, set this to 4
machine.motors = 4;

// -> What is `vehicle.motors` now?
claim(vehicle.motors, 4);

// -> What is `robot.motors`?
claim(robot.motors, 4);


// ------------------------------------------------
// Common JS exports for verification, don't modify
module.exports = {
    machine: machine,
    vehicle: vehicle,
    robot:   robot
}
Property assignments
Properties that are updated on the parent object are assigned to the object and don’t update the prototype.
// -> Define three objects: 'machine', 'robot' and 'vehicle'
//    In the definition of machine add a property 'motors' set to null.
var machine = {
    motors: null
}
var robot = {}
var vehicle = {}

// -> Let's make machine the prototype of robot and vehicle
vehicle.__proto__ = machine;
robot.__proto__ = machine;

// -> What are `machine.motors`, `robot.motors` and `vehicle.motors`?
claim(machine.motors, null);
claim(robot.motors, null);
claim(vehicle.motors, null);

// -> Set `robot.motors` to 4 by direct assignment
robot.motors = 4

// -> What are `machine.motors`, `robot.motors` and `vehicle.motors` now?
claim(machine.motors, null);
claim(robot.motors, 4);
claim(vehicle.motors, null);


// ------------------------------------------------
// Common JS exports for verification, don't modify
module.exports = {
    machine:  machine,
    vehicle:  vehicle,
    robot:    robot
}
Arrays and Objects
Strangely arrays and objects don’t behave in the same way. If you update an array or object property on a parent object they are updated on the prototype.
// -> Create three objects: 'machine', 'robot' and 'vehicle'
// -> In the definition of machine set a property 'parts', set it to an
//    empty array `[]`
// -> In the definition of machine set a property 'capabilities', set it to
//    an empty object `{}`
var machine = {
    parts: [],
    capabilities: {}
}
var robot = {}
var vehicle = {}

// -> Let's set the prototype of both robot and vehicle to machine
robot.__proto__ = machine;
vehicle.__proto__ = machine;

// -> What is `robot.parts`?
claim(robot.parts, []);

// -> What is `vehicle.parts`?
claim(vehicle.parts, []);

// -> What is `robot.capabilities`?
claim(robot.capabilities, {});

// -> What is `vehicle.capabilities`?
claim(vehicle.capabilities, {});

// -> Let's add a 'core' part to robot
robot.parts.push('core');

// -> What is `robot.parts` now?
claim(robot.parts, ['core']);

// -> What is `vehicle.parts` now?
claim(vehicle.parts, ['core']);

// -> Let's set an ability to vehicle
vehicle.capabilities.fly = true;

// -> What is `robot.capabilities` now?
claim(robot.capabilities, {fly:true});

// -> What is `vehicle.capabilities` now?
claim(vehicle.capabilities, {fly:true});


// ------------------------------------------------
// Common JS exports for verification, don't modify
module.exports = {
    machine: machine,
    vehicle:    vehicle,
    robot:    robot
}
Object Create
So by setting __proto__ directly it has easier to see how it behaves, however it is not yet fully supported. A more supported method is to pass the prototype to Object.create().
// -> Let's create an object called 'machine'
var machine = {}

// -> Use Object.create to create another object called 'robot' with 'machine'
//    set as the prototype
var robot = Object.create(machine)

// -> Use Object.create to create another object called 'robby' with 'robot'
//    as the prototype
var robby = Object.create(robot)

// -> What is the result of `machine.isPrototypeOf(robby)`?
claim(machine.isPrototypeOf(robby), true);

// -> What is the result of `robot.isPrototypeOf(robby)`?
claim(robot.isPrototypeOf(robby), true);

// -> Which object is the direct prototype of robby?
claim.same(Object.getPrototypeOf(robby), robot);


// ------------------------------------------------
// Common JS exports for verification, don't modify
module.exports = {
    machine:  machine,
    robot:    robot,
    robby:    robby
}
Dot new
A nice way of using Object.create() is to create a function on an object called new(). When new() is called return Object.create(this).
// -> Define an object called 'Robot'
// -> Define a method called 'new' in Robot
// -> When Robot.new is called it should return a new object with Robot as its prototype
//    e.g. var robby = Robot.new();
//    Robot should be the prototype of robby

var Robot = {}

Robot.new = function(){
    return Object.create(this)
}

var robby = Robot.new()


// ------------------------------------------------
// Common JS exports for verification, don't modify
module.exports = {
    Robot: Robot
}
Constructor functions
A popular way of creating prototype chains is to use constructor functions. This works by creating a function that has statements like this.{propertyName} = x. Then you call the function with new. The return object is linked to the function by its prototype.
// -> Define a 'Robot' constructor function
// -> Inside the Robot constructor assign a property 'motors' on 'this',
//    set motors to 2
// -> Create an instance of Robot called 'robby'

function Robot(){
    this.motors = 2
}

var robby = new Robot()

// -> What is the result of `(robby instanceof Robot)`?
claim((robby instanceof Robot), true);

// -> What is `robby.motors`?
claim(robby.motors, 2);


// ------------------------------------------------
// Common JS exports for verification, don't modify
module.exports = {
    Robot:  Robot,
    robby:  robby
}
Implicit This
When a constructor function is called with “new”, Javascript has an implicit reference to the new object being created with the “this” keyword. So it’s important to remember the “new”. To help remember to use “new” it is common to capitalise the first letter of the constructor function.
With my background in C# this is the method of creating instances of objects that is the most natural to me.
// -> Define two constructor functions: 'Robot' and 'Vehicle'
// -> When called with 'new', the Robot constructor function should return
//    the implicit 'this'
// -> When called with 'new', the Vehicle constructor function should return
//    an object of your own making, not the implicit 'this'.

function Robot(){

}

function Vehicle(){
    return {}
}


// ------------------------------------------------
// Common JS exports for verification, don't modify
module.exports = {
    Robot:    Robot,
    Vehicle:  Vehicle
}
The function prototype
So this one took a bit to get my head around.
Every function in Javascript has a property called prototype. This is not the same as __proto__. It is the object that an instance created by the function will have as its own __proto__.
So any property added to functionName.prototype will be available to all instances created by that function.
// -> Define a 'Robot' function constructor
// -> Create two instances of Robot: 'robby' and 'cranky'
// -> Both robby and cranky should respond to 'parts' and 'capabilities', these
//    should be empty arrays at first

function Robot(){
    this.parts = []
}

Robot.prototype.capabilities = []

var robby = new Robot()
var cranky = new Robot()


// -> Claim the result of robby.parts
claim(robby.parts, []);
// -> Claim the result of cranky.parts
claim(cranky.parts, []);
// -> Claim the result of robby.capabilities
claim(robby.capabilities, []);
// -> Claim the result of cranky.capabilities
claim(cranky.capabilities, []);

// -> Add 'core' to robby.parts, cranky.parts should still be empty
// -> Add 'fly' to robby.capabilities, after doing that cranky.capabilities must
//    also have 'fly' without adding to it directly, so this property has to be
//    shared

robby.parts.push('core')
robby.capabilities.push('fly')

// -> Claim the result of robby.parts
claim(robby.parts, ['core']);
// -> Claim the result of cranky.parts
claim(cranky.parts, []);
// -> Claim the result of robby.capabilities
claim(robby.capabilities, ['fly']);
// -> Claim the result of cranky.capabilities
claim(cranky.capabilities, ['fly']);


// ------------------------------------------------
// Common JS exports for verification, don't modify
module.exports = {
    Robot:  Robot,
    robby:  robby,
    cranky: cranky
}
node-windows
Using node-windows was the first time I’ve tried to setup a Node application as a Windows service and I couldn’t believe how simple it was.
I needed to serve up a static html file, so installing and configuring IIS seemed like overkill. So for in order to get the file served as quickly as possible I made a very basic express.js app.
Setting up the express app
To initially set up the app and create the package.json I ran the below command and taking all of the defaults apart fron the entry point which I set to app.js
npm init
Once the package.json file is in place from running npm init, then I installed express itself.
npm install express --save
The app.js file itself was extremely basic. Listen on a port and just return the html file.
var express = require('express');
var app = express();
var path    = require("path");

app.get('/', function (req, res) {
res.sendFile(path.join(__dirname+'/index.html'));
});

app.listen(3000, function () {
console.log('Example app listening on port 3000!');
});
To make the app accessible I just needed to add a new firewall rule in for the port it was listening on.
Adding the app as a Windows service
Initially I ran the express app from the command line with
node app.js
Which worked great initially, however, unsurprisingly it wasn’t long until someone else logged on to the server and thought “I wonder why this command prompt is open, lets close it”.
I was told about node-windows and thought I’d give it a go.
First job was to install node-windows globally
npm install -g node-windows
Then at my project root
npm link node-windows
Finally, I ran the below script taken from the docs with updating the path to app.js
var Service = require('node-windows').Service;

// Create a new service object
var svc = new Service({
    name:'Hello World',
    description: 'The nodejs.org example web server.',
    script: 'C:\\MyApp\\app.js'
});

// Listen for the "install" event, which indicates the
// process is available as a service.
svc.on('install',function(){
    svc.start();
});

svc.install();
and that was it! The express app was then accessible without having to run the app via the command line.
So this was just the basic setup of node-windows but it does have other features that are pretty cool. These include uninstalling services, killing processes by their PID and a clever wrapper around the node app for handling if the app crashes and needs restarting.
DbUp
DbUp is an open source .Net library that helps making database changes in a deployment an awful lot easier.
The docs for DbUp can be found here, however DbUp is so easy to use there isn’t much to them.
Setup
First thing to do in order to get DbUp working is to start a new console application then install the DbUp nuget package.
Install-Package DbUp
Any SQL scripts that you want to be run as part of the application need to be added to the project and set their build action to be an embedded resource. While DbUp keeps a track of the scripts it has run, I find it useful to name the scripts sequentially to help keep them organised.
In Program.cs you will need to add the code from the docs and then you are ready to run the console application. There is a debug conditional in the code with a Console.ReadLine() if there is a failure in the application so you can see the error message. It’s probably me being overly cautious but I also like to put the same debug conditional in for successes as well just so I can review those messages if needs be.
For deployments, all you need to do is run the console application in each environment by using a Powershell script for example.
Benefits
Just as automated code deployments are important, it’s also important to automate database changes. As its likely that database changes are less common that code changes, it can be very easy to forget to make any required changes if they have to be done manually.
While there are other tools such as Redgate’s SQL Compare and they are awesome, for keeping a database in a correct state for deployments I’m a big fan of DbUp. Rather than just comparing two databases I like to be in control of the changes and write my own scripts.
Another very useful benefit of this approach is that the database scripts can be stored in source control.
Given that DbUp is free and so easy to setup then I think this is a great tool to be part of deployments.
What I learned from The Goal
People have been telling me for years how good a book The Goal is and now I’ve finally read it.

Format of the book
The Goal is a management book explaining the Theory of Constraints and how it can be applied to a manufacturing plant. Rather than just explaining the concept, the book is a novel following a stressed out manager trying to save his plant from closing.
What is the goal?
One of the important lessons that I took away from the book was to remember what the goal of an organisation is. For many organisations this is to make money and if the actions aren’t helping towards the goal then they probably aren’t the right actions.
For example reducing costs in itself is not the goal, especially if it comes at the cost of sales.
The goal puts forward a simplified method of measuring yourself against your goal. It consists of three measures; throughput, inventory and operational expense. An organisation will want to raise throughput (revenue) while reducing inventory (money in work in progress) and operational expenses.
Theory of constraints
The book explains how the plant manager can help the plant by looking at where the bottlenecks or constraints are in the plant and work to maximise their efficiencies. Many people in the company were looking at the wrong performance indicators. For example they were focusing on cost per part and ensuring that all staff were busy all of the time.
However, its important to identify the system’s constraints. As the book explains, an hour lost on a bottleneck resource is an hour lost to the whole system due to its impact on throughput. It is much more important to have an optimised system rather than locally optimised parts of the system.
The approach to a problem
A system’s constraint isn’t always going to be a physical resource. It could be external, personal or a process so its useful to have a process of how to deal with different bottlenecks. The process that the plant manager comes up with is 5 steps to deal with a constraint.
- Identify the constraint
- Decide how to exploit the constraint
- Subordinate everything else to the constraint
- Elevate the contraint
- If the constraint is no longer a constraint then go back to step 1
Once changes have been put into place to help the bottleneck it is important to not let inertia stop further improvements. If an action helps to improve throughput it doesn’t mean that the action will always be the right action. Circumstances change and fighting the inertia of processes can be difficult. Its important to be able to respond to new challenges and opportunities.
How I found the book
When I first started the book I didn’t enjoy that the book was written as a fiction novel. It seemed that the information could be given in a much more succint way. I also didn’t enjoy reading about the main character’s marital problems.
However after finishing the book I do think that the style did help the lessons learned to stick. I do think that there is a lot to be learned from this book but I think the main thing I learned was to look after my wife, work is important but some things are more important.
My first programmed Arduino circuit
My last Arduino lesson was the first one where I had to build a circuit but also control it with a programmed sketch.
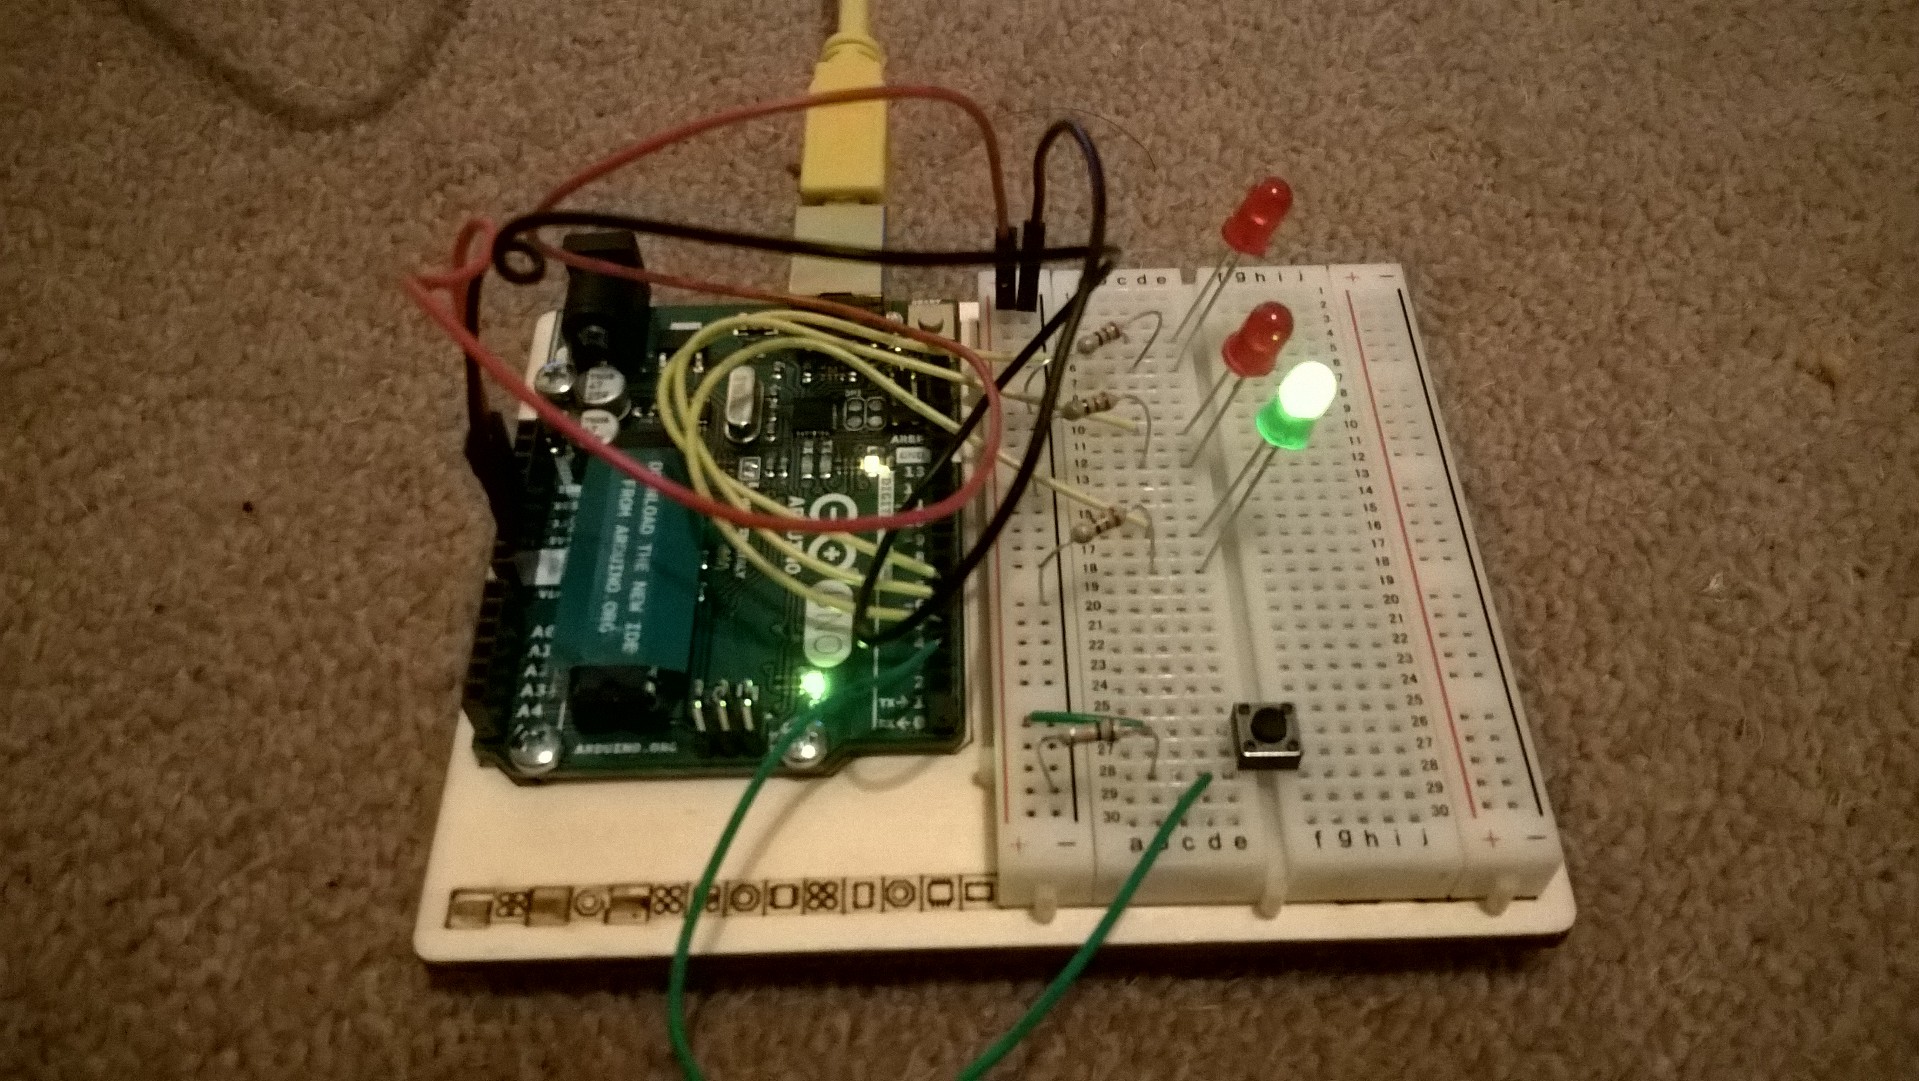
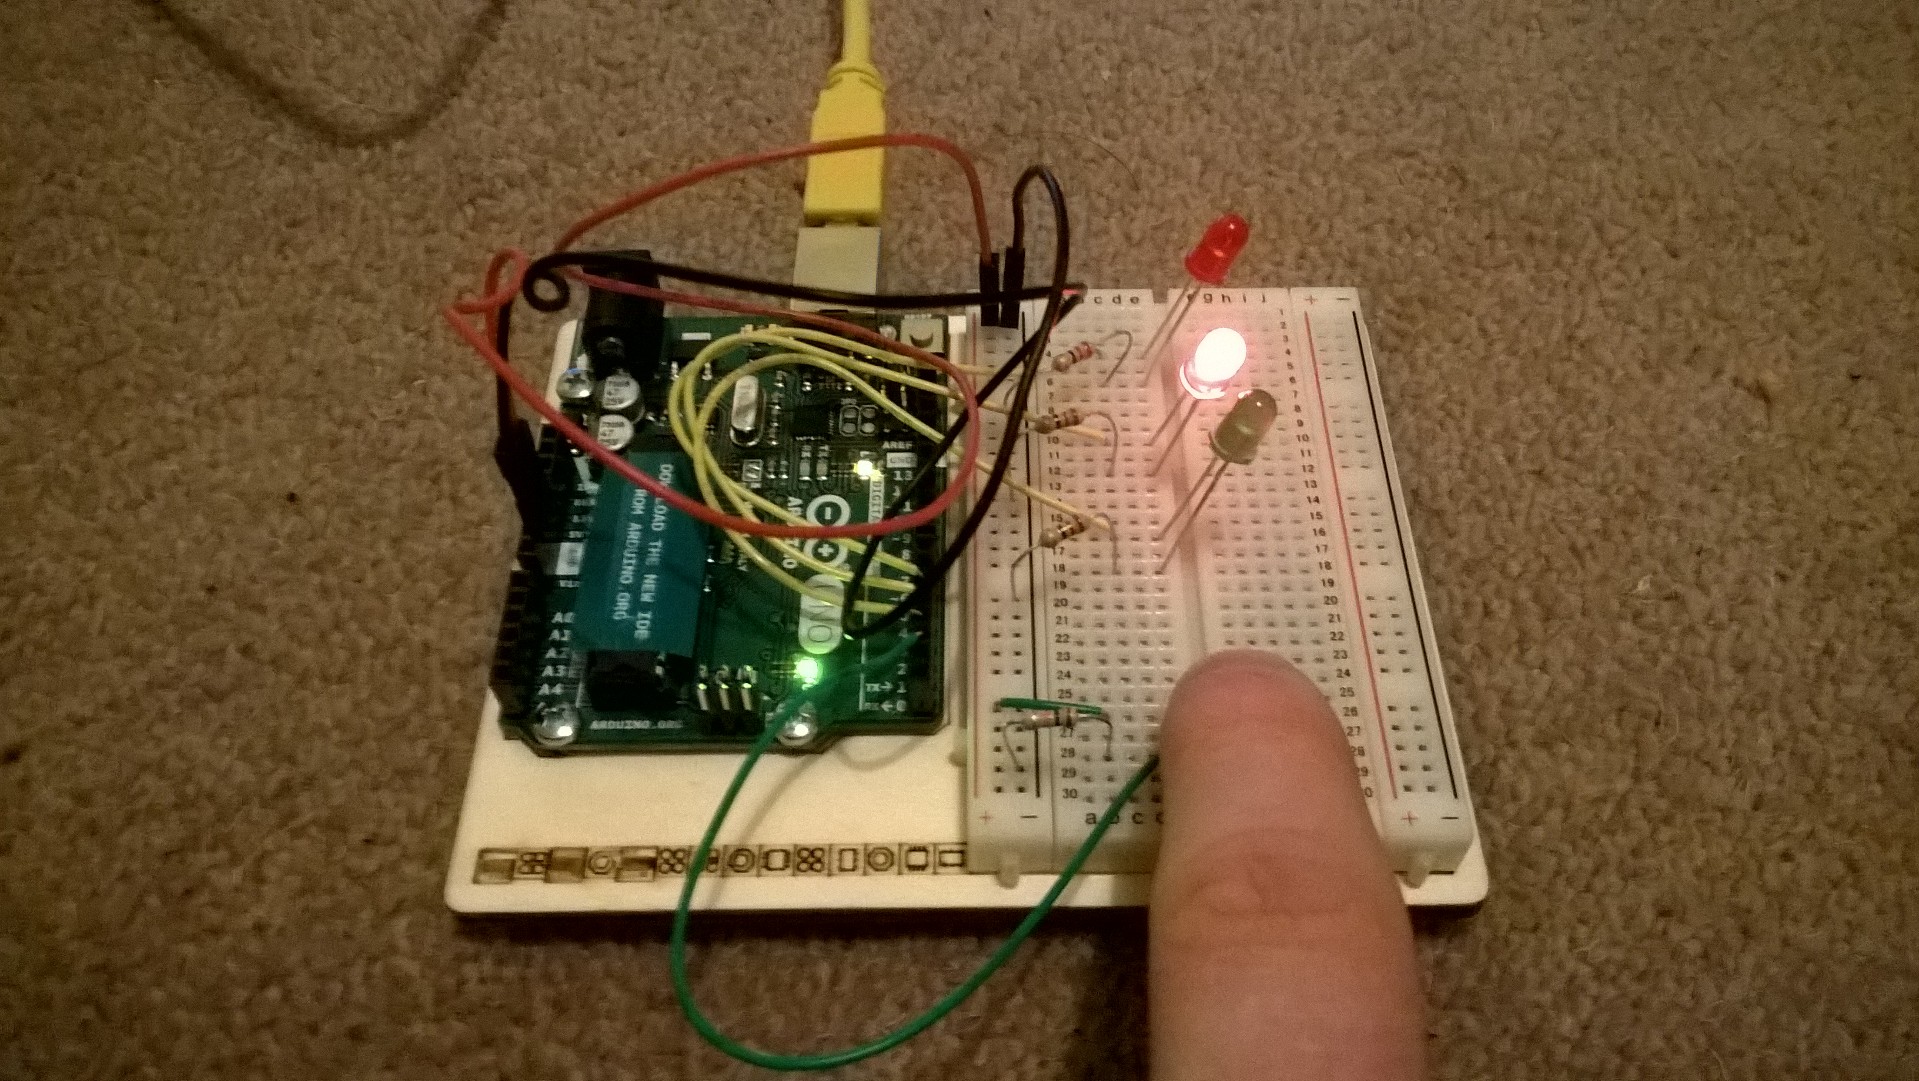
The Circuit
In this circuit there were three LEDs, resistors and a push switch. When the circuit has power the green LED is lit, but when the push switch was pressed the two red LEDs flash.
To achieve this, the LEDs and the switch in this circuit had to be connected to the pins on the Arduino. This allows the Arduino to control if the LEDs have voltage going to them or not. Pins 0 and 1 are used for connecting to the computer so its useful to start at pin 2.
Writing the Sketch
Each sketch needs two main functions in order to work;
void setup(){
}

void loop(){
}
Setup is run once when the program starts and unsurprisingly loop repeats throughout the program running. In the setup of the sketch the numbers of the used pins and if they are to be used as input or an output.
pinMode(5, OUTPUT);
pinMode(2, INPUT);
In the loop you can check if the switch is pressed down by using the digital read method and passing in the pin number of the input.
int buttonPressed = digitalRead(2);
As it is a digital input the value from digital read can be asigned to an int as it will return 0 or 1.
Similarly, digital write also takes a pin number as an argument but also if you want the pin to be set to HIGH (1) or LOW (0).
digitalWrite(3, HIGH);
My Full Sketch
int switchState = 0;

void setup() {
    // put your setup code here, to run once:
    pinMode(3, OUTPUT);
    pinMode(4, OUTPUT);
    pinMode(5, OUTPUT);
    pinMode(2, INPUT);
}

void loop() {
    // put your main code here, to run repeatedly:
    switchState = digitalRead(2);

    if(switchState == LOW){
        digitalWrite(3, HIGH);
        digitalWrite(4, LOW);
        digitalWrite(5, LOW);
    }
    else{
        digitalWrite(3, LOW);
        digitalWrite(4, LOW);
        digitalWrite(5, HIGH);

        delay(250);
        digitalWrite(4, HIGH);
        digitalWrite(5, LOW);
        delay(250);
    }
}
Apart from learning how a sketch is built and what happens when it runs, this lesson also taught me more about resistors. Here the example circuit had each LED connected to the resistor on the ground side of the circuit. As long as the circuit is wired in series it doesn’t matter where the resistor is connected.